A week in and out the shop
11 Jun 2018
This week has been a quiet week in the workshop. At the start of the week the prototype offset was at the stage whereby it just had a coat of oil on the body and neck once a day, and then since I’ve left it a full week to cure properly. In the coming days I can get back into action doing the assembly and cutting the pick guard etc.
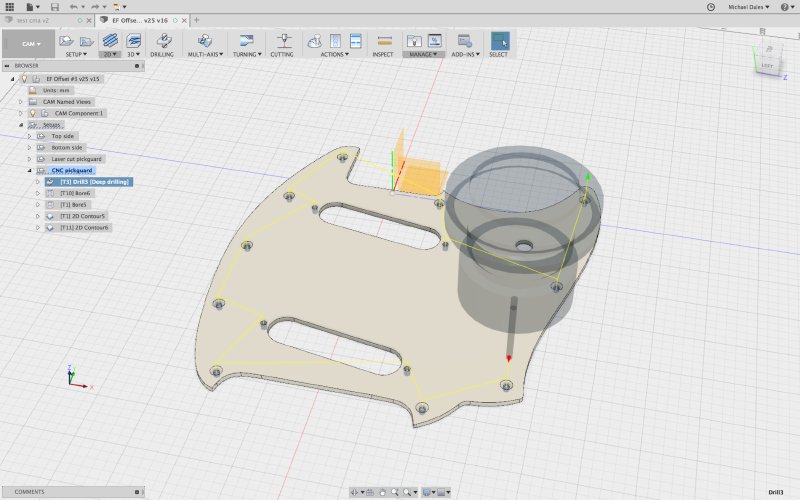
As mentioned last week, I realised I can’t laser cut the pick guard (as most pick guard material isn’t laser cutter safe), so I’ll have to mill it instead. Given I was milling it I’ve ordered a 60˚ angled router bit so I can chamfer the edges properly. Last time I tried to use the CNC router for this kind of thing the material cracked around the spaces near the screw holes, but I’m confident this time I’ll have better success as Fusion 360 lets me control things better than the tools I used before.
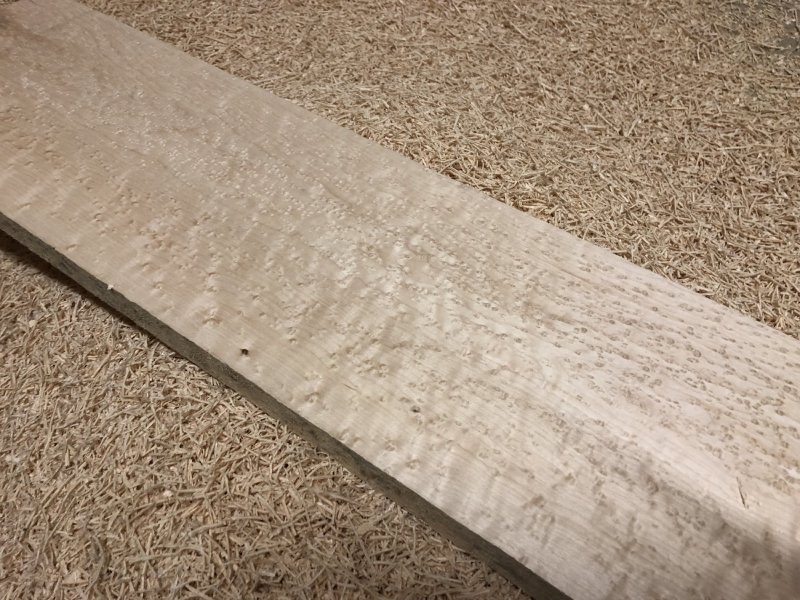
In prep for heading up to DoES Liverpool next month to use their CNC router I started the process of getting all the wood ready for that trip. I need to make a new body blank to replace the one that was destroyed by the errant router at Makespace last time, and I have had for ages a bunch of nice wood sitting around ready to make the necks for the two commissioned offsets. The first stage was to thickness all that wood, and I once again took the kind offer of a friend to let me use his thicknesser.
At the moment I’m feeling that the number of guitars I’ve generated is very poor for the amount of times I’ve used this favour. Hopefully we can start to put a dent in that.
I really feel that as we reach the mid point of 2018 I’ve not had a successful first half of the year: I’d hoped to have made three or more guitars by now, but it looks like I’ll only have managed one guitar, the amp, and a bunch of harsh lessons about things going wrong. It’s very easy to let setbacks cause you to lose momentum, particularly when you have other things you need to do to pay the bills, and I look back on the first half of the year with a sense of having got distracted and not kept up pace.
To try and offset some of this (pun not intended), I’ve been looking at what I can do to try and turn some of the bits I have left over from failures into an actual guitar that I could ship as a sort of factory second. I have two bits that immediately come to mind as things I can try spruce up. Firstly, I have the neck where the fretboard didn’t glue on perfectly, leaving it with an obvious seam that meant I couldn’t use it. I think with this I could either go for an edge binding to cover the seam, or I could try perhaps heat it up to melt the glue and remove the fretboard entirely and try re-glue it. I bought some binding material, but the standard sizes it comes in of 1/4 inch is not quite deep enough to reach the seem without having to have a couple of mm off the fretboard top itself. Anyway, as other things move forward I shall see if I can find a way forward here - suggestions welcome!
The second bit is the body that the router ruined that was meant for one of the commissions. It now has a large gouge near the upper horn from there the CNC router decided my design wasn’t interesting enough, and it had a better idea. What I’d like to do with this is fill in the gouge and finish cutting the body out with templates. It’s not going to be useable on the commission, as it’ll be an obvious flaw - the guitar will be finished in stain/oil and it’d show through. But after filling I could paint this one to hide it, or I could follow the Kintsugi philosophy (on both this and the neck actually) and fill the area with a gold resin, and make it a feature that tells the tale of the troubled build process (a hat tip to my friends Marine and Dom for that suggestion).
My problem is that I’m a perfectionist about the guitars, and I want them to be flawless, and when I fail to hit my mark I sort of shy away from things for a bit as I lose my confidence that I can achieve what I want is dented. This is something I need to try come over, as its an inherent part of learning and getting to grips with hand crafting physical objects.
As part of trying to continue to develop my manufacturing skills by tackling some smaller projects I bought a cheap effects pedal kit and set about designing a case for it. Currently I’ve just started with a traditional shape, but eventually I’d like to do something less uniform in its shape and 3D print that.
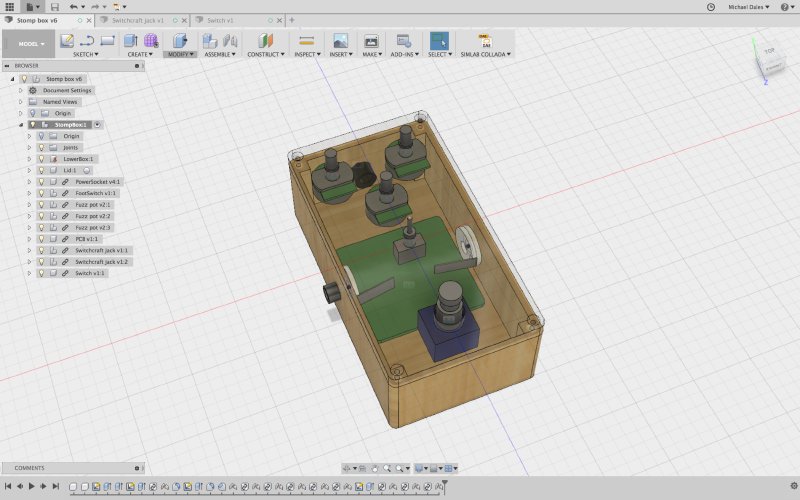
Strength will be the main issue with anything 3D printed, as in the heat of the moment effect stomp boxes probably take quite a hammering. But this is mostly as an experiment, and if it fails I’ll have learned something and I can just use the metal enclosure that shipped with the kit.
I also spent a couple of days this week refining the audio effects software I was playing with last week, trying to shape it into something that is more practical to let me (and potentially others) experiment with. There’s a saying in software that once you’ve finished 90% of the product you get to do the other 90% - a reference to the fact that the interesting bit you care about is what you think will take most of the time, but is in fact only half the problem, and you still have to do all the dull and tedious bits to make it usable by people. I spent some time this week on tweaking my software so I could save my effect filter experiments and share them between all my iOS devices. allowing me to work on them both on my phone and tablet seamlessly. It’s been a long time since I wrote iOS software in anger, and thus a lot of time was just trying to get back up to speed on this.
I’ve been testing using an old iRig2, which is great for travel, but is very frustrating to use most of the time with my pedal board, as it requires long heavy audio cables running up to my iPad and back to the board. But this week the Orange OMEC Teleport finally hit the shops, which is effectively an audio card in a stomp box, which then has USB out the stomp box to your phone/tablet/laptop. So to try and stop me going crazy due to tripping over cables I ordered one of these to make it easier to test.