A week in the shop, and Liverpool MakeFest
Published 1 Jul 2019
This week began on a great start, with a new commission coming in, a hectic middle as I tried to get everything ready for Liverpool MakeFest, and had a wonderful end with MakeFest itself. As such, this is a long post, so apologies, but a lot went on!
At the end of last week I’d strung up the cigar box guitar to let it sit under tension for a day or two, but just because it had strings on didn’t mean it was ready to play, or indeed to show at MakeFest.
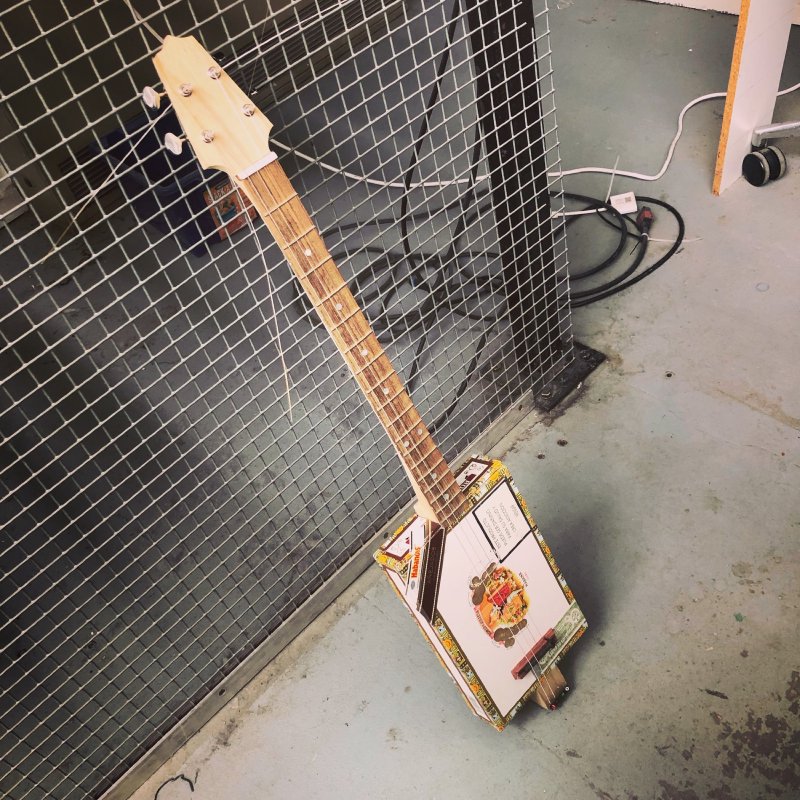
Although I could strum it, and I even managed to get the bridge positioned such that the intonation was okay, not everything was as finished as it looks. Most notably the nut wasn’t yet fixed in position: in the above picture is simply held roughly in place by the strings, but that’s not a good long term solution. Clamping it for gluing was tricky as there’s not really any good surfaces to use a regular small G-clamp at this point, and I’ve no idea what the “proper” way to achieve this is, but in the end I just used some rubber bands looped over the neck to provide pull both down into the neck and along into the fretboard. I also had to use a tiny shim of veneer, as I over sanded the nut trying to get the bottom to match the angle of the headstock (which creates a nice visual effect, which I’ve had positive comments on, so a happy accident there). I also wasn’t sure what glue to use here, but in the end opted for the the wood Gorilla Glue I normally use, and that seems to have held well enough.
The next day, having let the glue set for 24 hours, I then went to tidy up the nut and veneer shim: getting it flush with the neck, trimming the shim to look neater, and removing any excess glue. The selection of tools for this shows you that I’ve become a changed person this last few months thanks to fellow Makespace member Graeme introducing me to properly sharp tools:
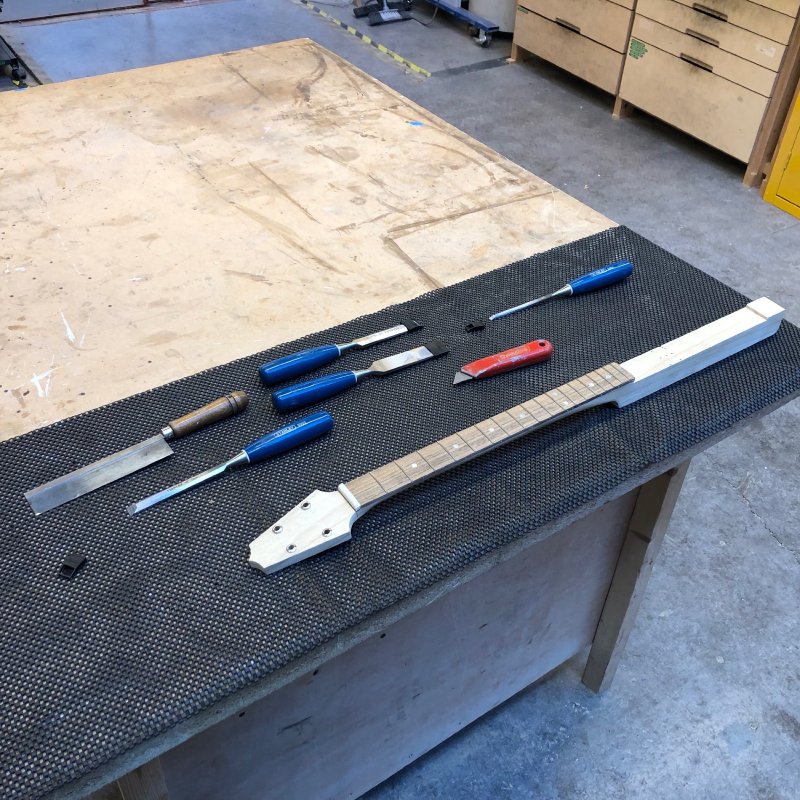
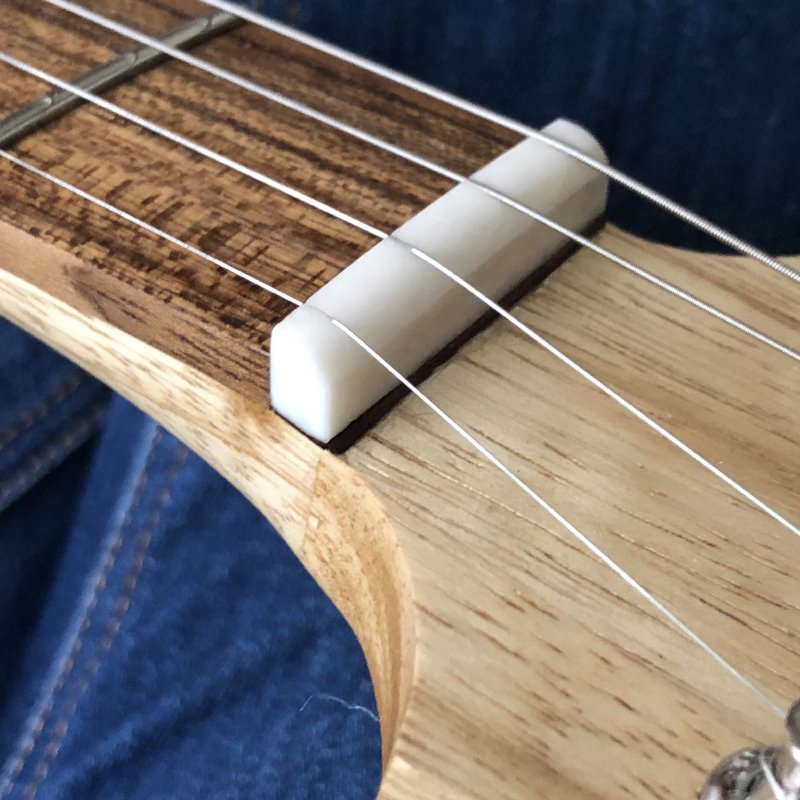
I did use some sand paper to get the bone nut down, but then I was in with the chisels etc. to tidy things up properly. Here’s the finished result, where you can see the shim, and perhaps get an appreciation for why it was hard to clamp down the nut.
With the nut properly secured and tidied, I took a second pass at the neck. Having it strung up before let me get a sense for how it felt to play, and I found I wanted to round out the neck a little more. That done, I then sanded the neck up through the grits, going up from 240 all the way up to 2000 grit, after which I started to apply the finishing oil. As ever, this made the bits of wood really come alive.
By this point it was the day before I had to travel up to Liverpool, so I was running out of time. I managed three coats of oil that day, applying a coat every 4 hours. Normally I’d have gone for more coats, but three is more than enough to ensure that it remains nice and clean despite having lots of people play it at MakeFest.
I didn’t get everything done on the cigar box guitar, most notably the electronics didn’t get started properly, but it was enough to let people play it acoustically. The next steps once back from Liverpool will be to get the pickup installed, and to put some support material inside the cigar box so that it’ll take being held up by a guitar strap and having a cable dangling out the side. The wood in the cigar boxes isn’t designed to take either of these strains, and I’ve made it worse by splitting the side edges to run the neck through, so some form of bracing will be needed.
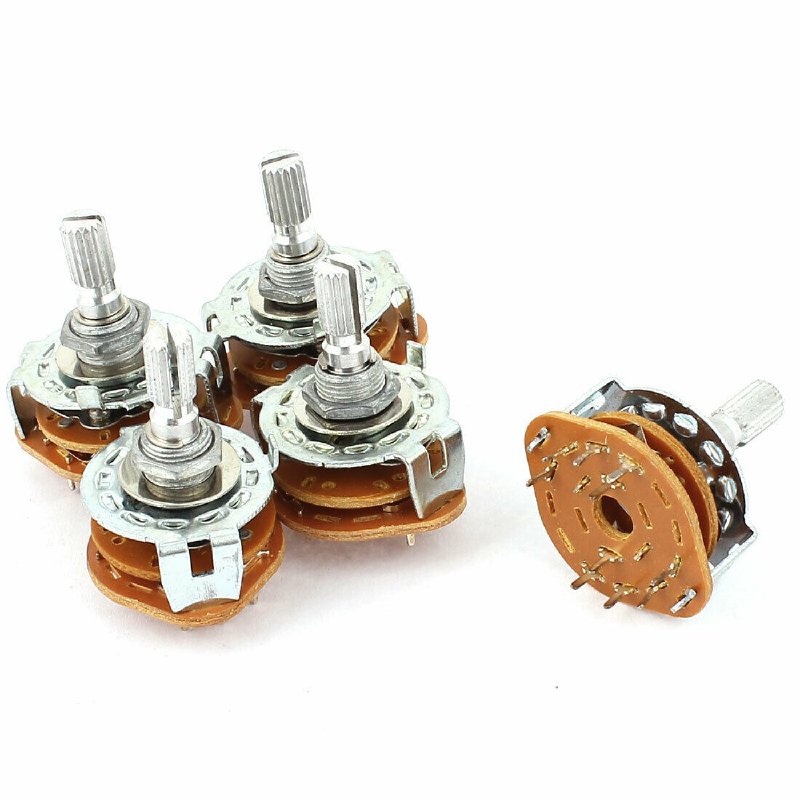
The next thing I wanted to sort out before Makefest this week was the pickup selector on the Phoenix Offset (the new name for the Recovery Offset). I use a 4-position rotary switch for the pickup selector, and in testing I’d realised that how I had things set up wasn’t durable enough. As ever, it’s one thing to make a thing, it’s another to make a thing that’ll withstand abuse. For reference, this is what the rotary switch looks like (apologies for the stock image, but I’m away up North still):
The problem I hit was because there’s no visual indicator on the guitar of what the range of positions is on the selector, people don’t know when they start where they are, and as a consequence tend to try and over turn it. The switches themselves actually ship with a little tab on them that can lock into the surface you mount them on (you can just see them in the above pic if you look hard enough), but that requires a hole to be put through that surface (in this case the pick guard), and I didn’t want that visual artefact, so I’d removed the tab and was relying on just tightening the nut that secures the selector to the pick guard to be secure enough. But it turns out someone who’s not familiar with the guitar doesn’t know how much force to give to turn it, and they were able to rotate the entire assembly when going too far.
I decided to try solve both problems at once: my plan was to create a little position indicator that would sandwich between the pick guard and the control knob with tick marks in each of the positions. This indicator would solve two problems: firstly it would show visually the range of options so people wouldn’t feel the need to keep turning to see if they’d reached the end or not, and secondly I could make it wide enough that it would cover over any hole made to let me use the locator tab on the rotary switches themselves.
I’d ideally liked to have made this indicator in chrome to match the other control bits on the guitar, but I didn’t have time for that - I needed this problem solved before attending MakeFest and unleashing the public on this guitar, so I did some research and found a very thin (0.7mm) laser safe laminate that had a brushed metal effect on the top and black underneath. A little fun with the laser cutter later, and I had this:
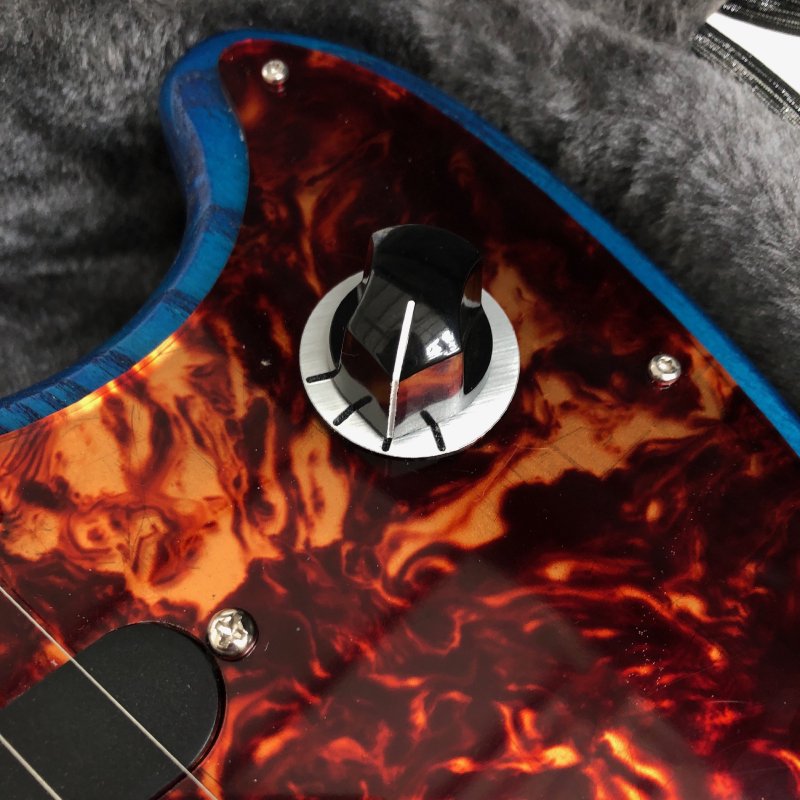
I realised after installing this that it reminds me of the indicator disk used on the Varitone control on some of the Gibson ES guitars, and I wonder if that’s solving both the same problems there too.
In the end a fully circular design didn’t really suit the flowing lines of this offset, so for the final version I went for a more minimal curved design that doesn’t disrupt the look of the guitar too much. My friend Jason has suggested another variation, which looked nicer, but again I was against the clock this last week, so that’ll be something to try in the near future.
I similarly didn’t have time to unsolder the rotary selector in the guitar and change it to one with the locator tab on it before heading up to Liverpool, but in practice just having a visual indicator was enough that despite many people trying out the guitar a MakeFest, not one of them tried to over-turn it, the visual indicator was enough. Clearly in practice I do want both - I don’t expect an on-stage guitarist to have time to check the little indicator plate every time - but it was nice to see that this small addition to the guitar was worth the effort.
It’s details like this that make a big difference to the long term usability of an instrument, so it’s well worth the effort spent in fixing little niggles like this.
I did a bunch of other small bits this week in between getting the two guitars above ready for MakeFest. Firstly, I ordered the wood for the new commission (which as ever came from Exotic Hardwoods UK Ltd.), which turned up later in the week and I got the ball rolling on that build by doing the initial thicknessing of the body halves, using the new thicknesser at Makespace:
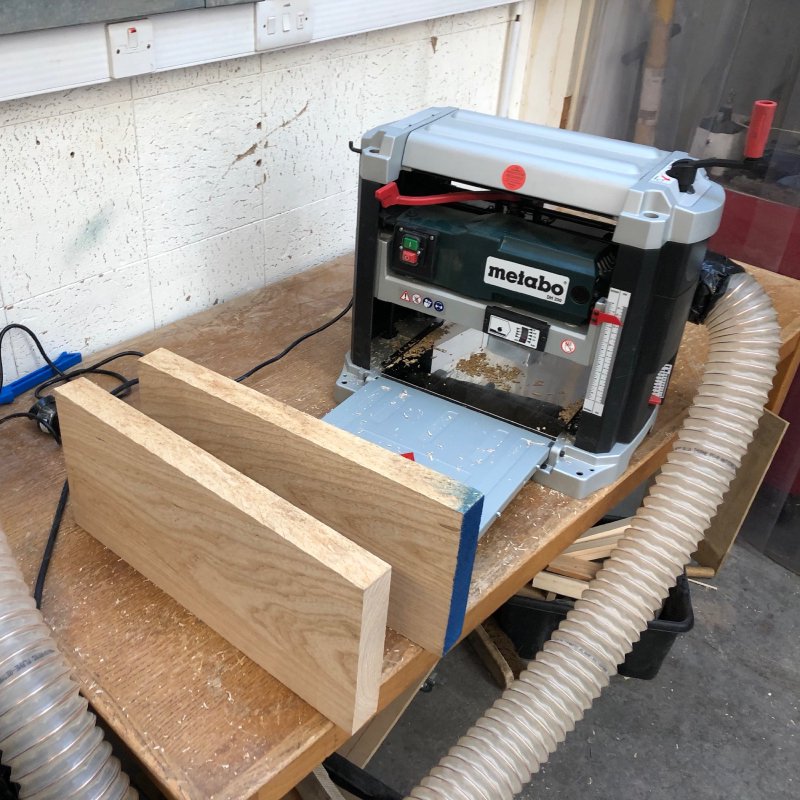
This one will be a swamp ash body, a maple neck, and a rosewood fretboard. It’ll be very similar to the Phoenix Offset above in functionality, but with the darker wood fretboard, and stained green rather than blue. The pick-guard material is up in the air until we see how the green stain comes out and then the client and I can decide what will work well with that.
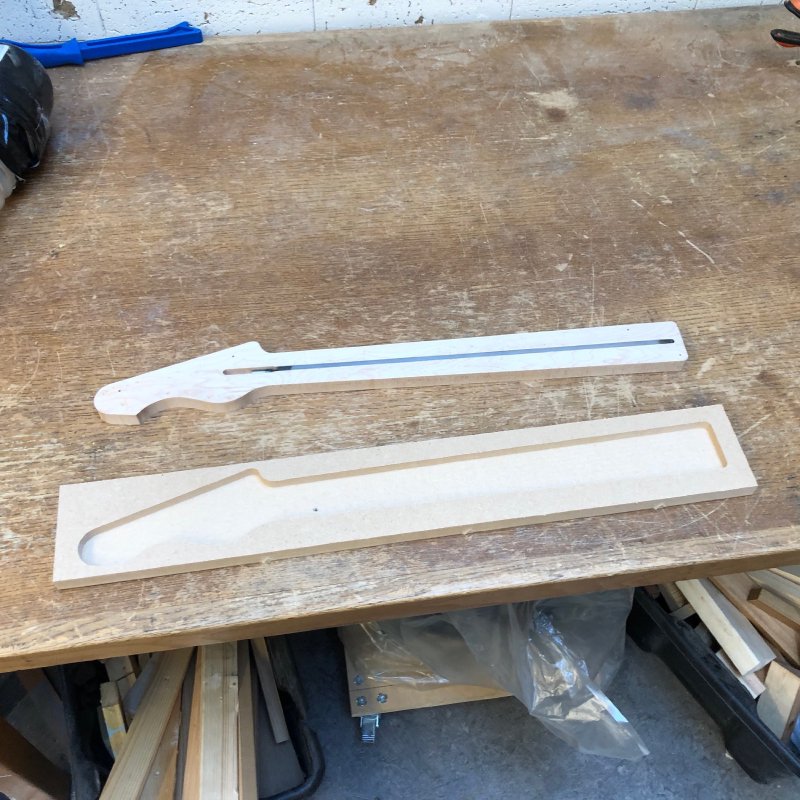
The second bit I worked on was making jigs for the Corvette guitar I’m making. Last week I routed out the main part of the neck, and the next steps for that are to shape the headstock, but to do that I need a way to hold the neck such that the centreline is horizontal, but a neck has no edges perpendicular to the centre line, and thus a jig is needed. I found some 18mm scrap MDF in the Makespace trove that was big enough and cut that out on the CNC Router:
It was a shorter week in the workshop, as Friday was driving up from Cambridge to Liverpool in time to help set up Liverpool Central Library on the Friday evening ready for the exhibitors to arrive on Saturday morning. My other half, Laura, had volunteered to help lead the set-up crew this year, and so given I was going to be around that evening anyway I pitched in as crew and helped with the general setup (as did several other exhibitors like myself who were in the area early). This mostly involved clearing bits of library to one side and then carrying trestle tables left, right and centre (and then on the Saturday evening after the event doing the inverse to restore the library to its normal state). I’m not sure I’ve had so much exercise for a long time :) In just two hours we’d got pretty much everything transformed from being a normal library space to somewhere ready for a bunch of makers to descend and exhibit the weird and wonderful things they’ve been creating.
This was also the time when I heard the best phrase said to me in a long time: “don’t worry, the steampunks will be here soon.” :)
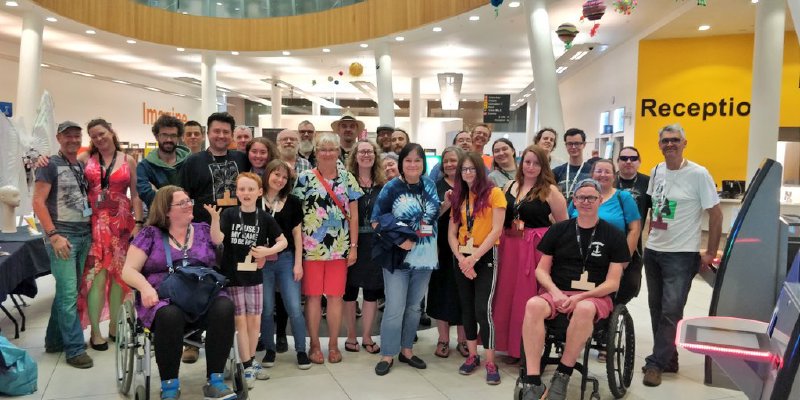
Events like this are really a labour of love by so many people, and it was great to be part of the broader team, with everyone pitching in with good spirits.
As it has been in previous years, the day of MakeFest itself was a blur. Once the library doors open and people start coming through it’s seven hours of talking and explaining and demonstrating to people: an exhausting but fun day.
As in previous years, on my stand I was trying to demystify how electric guitars are made. The guitar itself is a very democratic instrument, there for anyone to pick up regardless of musical ability and make some noise for their own amusement or for others. I’d argue that it’s also a democratic instrument in terms that anyone can, with a bit of perseverance, also make a guitar. I wanted to try and help people see this. Not that it is for everyone, but even if they don’t go on to build one themselves, they will know a bit more about how a thing is made, rather than it just being an atomic object.
On my stand I had a stack of the wood required to make one electric guitar on one side, an in progress body and neck in the middle, and a finished guitar on the right, and I attempt to draw a narrative that helps people see how the pile on the left moves to the guitar on the right, demystifying the process. The cigar box guitar was a new addition to the stand this year, and this was an attempt to show that actually if you just wanted to make a fun instrument, you don’t even need to make anything as fancy as what I normally do.

In addition to that, one of the joys for me as ever in this kind of thing is letting people play my guitars, so I had my small workbench amp with me (the excellent Blackstar Fly), and I happily let anyone who felt willing to try have a go. There were many players pass through, of all ages and backgrounds, and all of them made me happy that they could get one of my guitars to sing for them.

As ever it was a great day: I had lots of interesting conversations, I was able to open some people’s eyes to how things are made, and I learned a few things myself too from the conversations. A huge thanks to everyone who stopped by to say hello, as you made the day worth all the effort.
It’s always slightly nerve-wracking taking your latest pride and joy (or in this case, two prides and joys) and giving it over to a series of strangers to play, but it really is rewarding; if you build guitars, I can’t recommend enough getting them into the hands of people to play. It’s very easy to worry about people dinging them, but in practice people are generally very careful with the instruments, and respond well to being guided about sitting down to play (which I strongly recommend), and with younger kids I position myself ready to catch the instrument should it slip. It’s also a good stress test of your instrument (as I was describing with the pickup selector above) - giving it to strangers will quickly show up niggles that you haven’t spotted.
It’s also a good way to get feedback from a wide-range of players. For instance, neck profiles are a personal thing, and over the years I’ve learned that people tend to like a broader neck that I do. It’s only by putting your guitar(s) into the hands of many players that you get to learn what people like. The positive feedback is a useful indicator of how far you’ve come, and kind comments are always appreciated, but it’s also very useful to learn what different features people do and don’t like.
One thing that did make me happy though is the overall tone of the comments on the guitars did confirm to me that year-on-year I am getting better at this guitar building thing, which is great to see, and something you can only tell by putting things out there.
Despite the overall day being good, I did leave with a feeling that I failed in my original aim of trying to make people see that guitar building was something they could do. The pitch just wasn’t working, and I wasn’t getting across the narrative I wanted people to take.
Without trying to sound like I’m bragging, I think the guitars I had on the stand this year were a bit too good compared to when I did this for the first time two years ago: whereas the logically leap from a pile of parts to the first guitar I built was tractable, I think a lot of people found the leap from that pile of parts to my latest guitar somewhat too wide to make. They all said nice things about the guitar, but it was generally done in a way that implied I’d done something special they couldn’t do, which wasn’t the point.
Even the cigar box, which I made for this event in an attempt to show you can make a very simple guitar using just basic tools, possibly turned out a bit too well. For example, I gave it fancy headstock as I just wanted to try some new techniques I’d not done before whilst building it, but that makes it look more professional than is required for such an instrument. For this event I should have stuck with a simple straight headstock if I wanted to convince people that they can make something with very little experience.
So, whilst I had a good time, and got lots of positive response from the people I talked to, I left the event feeling that next year (assuming they’ll have me back of course), I will need to do a radical revamp and either tell a different story, or a approach to telling this story. I had originally hoped to try something different for this year, but work pressures caused me to run out of time; now I have 12 months to prep, so I’m going to start planning the next one now.
The one bit where did feel I was able to help someone along their path to building a guitar was chatting to a young chap called Oli (who is actually the person playing the guitar above). He’s at Neston High School, who have a Makes club, and he’s been trying to make a guitar as part of his assessed project work. As a fan of 60s guitars, I was delighted to see the tear shaped guitar he’s building.
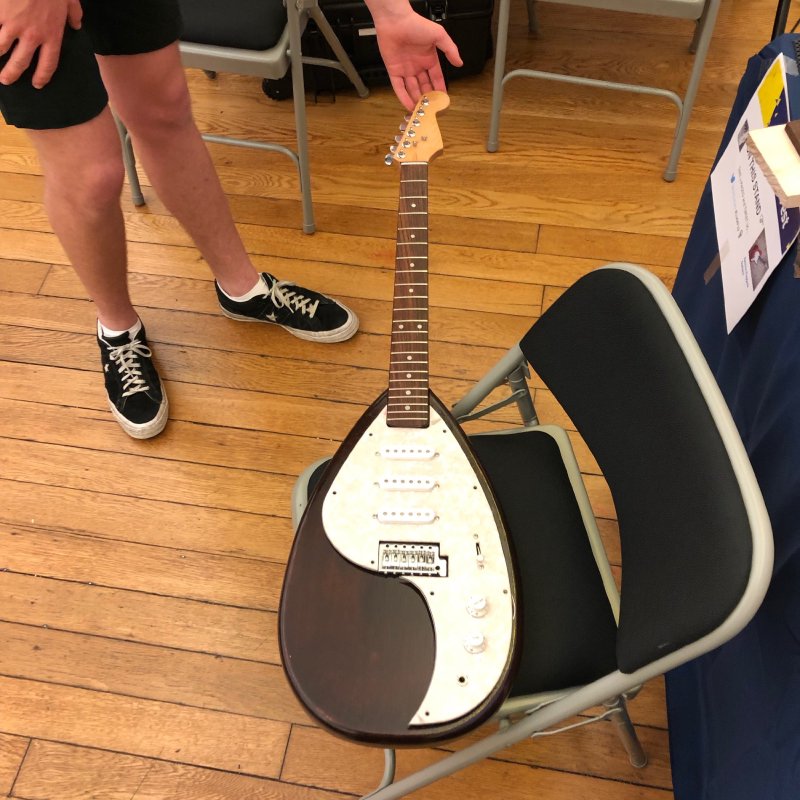
The guitar started life as a stratocaster type guitar, and Oli’s made it a new body and pick guard, turning it into something like a Vox teardrop guitar, which looked awesome. He’s done a good job on the pick guard too, which is entirely custom made, and had a nice straight edge. I was very impressed both with Oli’s work and Pat’s tutelage.
Oli was struggling a bit with the electronics, so his teacher Pat (who I met last year) pointed him in my direction. I had a quick look, and it seemed everything was in order, with the exception of a few simple things that are the normal kind of mistakes I might make. Truth be told, I didn’t have much to help him with, as he was actually getting it right, but I think sometimes we all just need that confidence boost of someone experienced telling you that your frustrations aren’t unique to you, and you’re on the right track (I know I do, and is why I make efforts to engage with the broader luthiery community), so that was a service I was happy to provide. We had a good chat, and hopefully I convinced him he was on the right track and to keep going. Fingers crossed he does, as I’m looking forward to giving the guitar a play next year!
Related, Neston High School Makers are trying to raise money via crowd funding to help them set up the workshop to let them recycle plastic themselves for use in projects. If you want to help support something that encourages kids to make things in a sustainable way, then go have a look.
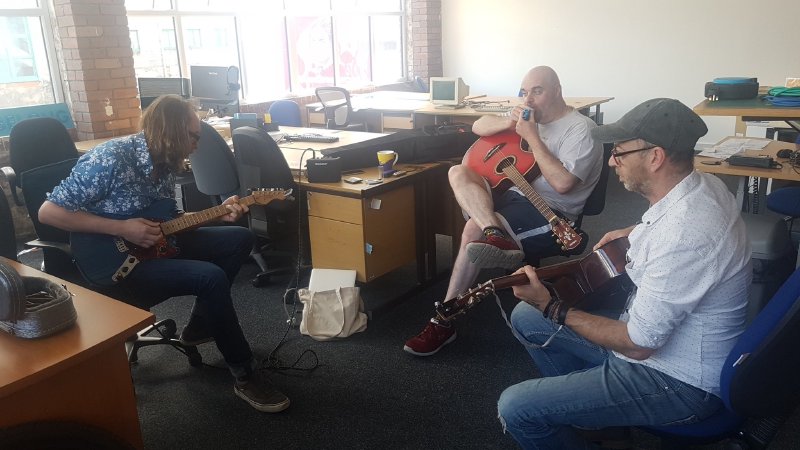
The Sunday after the show, we headed into DoES Liverpool, the local equivalent of the community workshop I work out of in Cambridge, and something that is a large part of why there’s a good maker scene up in that city. It was a nice chill day with people from Makefest coming by to relax after a hectic couple of days. We even had a bit of a jam session in the afternoon (with MakeFest organiser Caroline, who took this photo, on bassline) , which was a lot of fun, and we’ve promised we’ll have to reform to perform at next year’s event.
Being in DoES is always interesting to me, as it’s like Cambridge Makespace in many ways, but also nicely different in others. It’s a good reminder that how the community workshop I take part in isn’t the only way things can be done, and that for all the things I like I about Makespace I can see in DoES things that it doesn’t do highlighted. I think it’s particularly poignant to me now that I can reflect on the last year or so of putting a lot of time and effort into making Makespace be a better version of itself; it’s a reminder that I should perhaps occasionally step back and think that there are other approaches that I could consider beyond improving on what’s there.
DoES, for instance, seems to do a better job of doing larger group projects across their community. At Makespace we do more polished individual projects. I’m not sure where this comes from, and even whether it’d be a good fit for Cambridge to try and change, but there’s some really nice projects I see at DoES that it’s hard to imagine getting off the ground in Makespace due to the way we individual members are pushing forward on our own projects. Many of these things may not fit Cambridge and it’d be wrong to try and impose them, but it was interesting to reflect on these differences with a couple of the Makespace crowd who were also in attendance.
Finally, I saw lots of cool projects whilst at MakeFest and DoES. Too many to call out all of them, but some particular highlights I recommend you take a look at:
- Rachel of Little Vintage Photography had made these wonderful kits to let you make your cyanotype photographs which I loved the aesthetic of
- Robert White has been making some of the most amazing laser cut artwork I’ve seen. They look awesome in pictures, but in the flesh they look even more so.
- Sasha Spyrou had made a wonderfully vibrant set of painted wooden trinkets called the Cabinet of Curiosities
- After seeing pictures of it a while ago, I finally to got to see Snoof’s 3D printed, magnetically linked, snake toy, which is a great modern take on the snake toys I had as a child