A week in and out the shop
Published 30 Sep 2019
Tags: dad, festival of maintenance, graduation, the green tiger
One of the things that I think is important if we’re going to talk about making, which I do a lot of, is talking about failure. I have a sort of mission to normalise failure, rather than have it seen as exceptional. I don’t want to be known as the guy who gets thing wrong, but at the same time I want to encourage more people to have a go at making things, so I think it’s important to show that things don’t always go right, and that’s okay. I’d much rather people avoided failure: measure, measure, cut is definitely a workshop motto I can get behind; but at the same time things will go wrong still on occasion, you’ll never be completely mistake free if you’re building things by hand.
The main thing is not to get discouraged when things inevitably go wrong, but instead find the lesson in what went wrong and use that experience to level up. Getting things wrong is how you improve a lot of the time.
That said, it doesn’t mean that when I get things wrong I don’t at times find it very disheartening, and this week was one definitely a biggie in the things going wrong stakes. I made a very costly mistake, something of which I’m not proud, but I’ll still share it with you as hopefully it’ll help someone out there either to avoid the mistake or understand that things like this happen.
Commission No. 10
I was working on the neck for commission #10, which last week I’d got to the stage where the fretboard was on and trimmed bar the headstock transition. I started this week by using the spindle sander to get the headstock transition in place. Here I use the jig I made to hold the neck in place, and then use the spindle sander with a 3” diameter sander to make a nice round transition from the headstock face to where the fretboard ends. This is quite tricky to ensure you don’t over sand, but by going slowly and cautiously it all went okay.
The next stage for the neck was to put it into the laser cutter to mark where the frets should be and to put the logo on the headstock. But before I put it in the laser cutter I wanted to do a quick pass over the headstock itself with my orbital sander to remove any marks from where it was cut on the bandsaw. Although our new bandsaw at Makespace does a relatively clean cut, there’s still some small scratches there, and I want to do the more difficult sanding before I have the logo in place after which I need to be much more careful as otherwise I risk damaging the logo.
Thus, out came the orbital sander, and to work I went. There were some cutting marks that didn’t seem to want to shift: I suspect the bit of maple in that position was quite tough. Unfortunately I was so concentrated on that bit, I failed to spot that my sander was quite happily removing quite a bit of material on the other side of the headstock, and I basically ruined this neck by making the headstock too thin in the middle where the tuners will go:
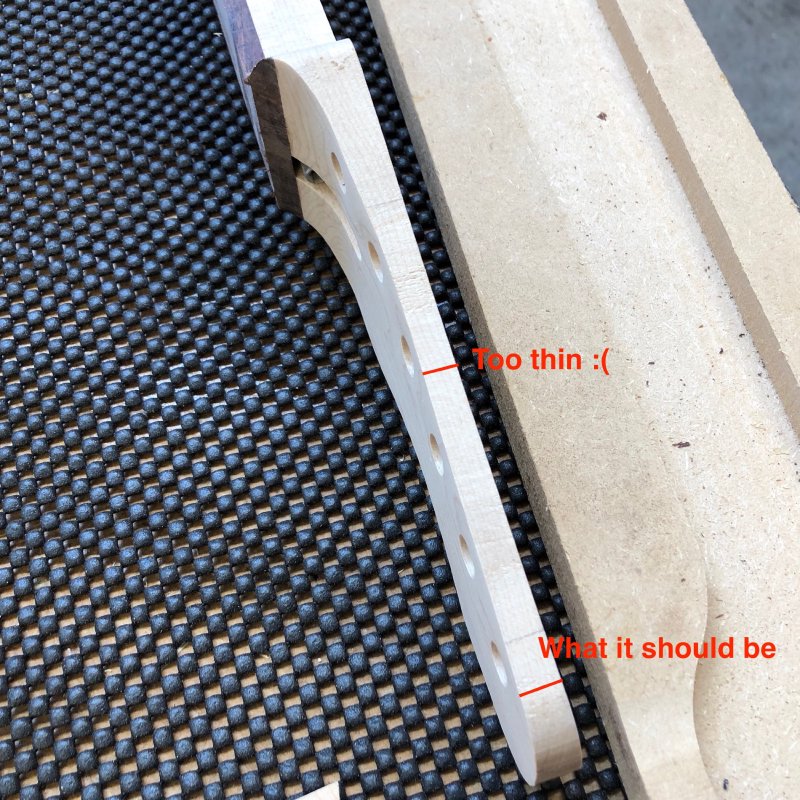
I still don’t quite understand what I did wrong here, as I thought I was being careful with where I applied the sander such that I was not sanding away from the area with bandsaw marks on the far side, but clearly I wasn’t holding it as straight as I thought and put more pressure on other areas than I realised.
The net result is now I have to build a new neck for commission #10. This is an expensive mistake on my behalf, partly in terms of materials I’ll need to replace (new bit of maple for the neck, a new bit of rosewood for the fretboard, and a new truss-rod), but more so in terms of time.
Once I’d got over my initial frustration with a really strong cup of tea, I got in touch with the person who commissioned this guitar, and explained the situation, how it would impact my delivery estimate, and offered a full refund of their deposit if they were unhappy now I had to push back the delivery date. This is my guide to dealing with when things go wrong on a client build. Ideally you never have to do this, but there will always be times when things go not to plan, and the best thing you can do is be transparent about it with your client and work with them, and if you’re letting them down on your original estimates offer them a way out. Had they said they didn’t want to continue then I’d have been out of pocket for the materials, but I’d rather they at least had a part in the discussion than they felt I was messing them around or taking advantage of them. Longer term I want to have a reputation as someone who is good to work with, rather than worrying about short term cash flow.
Thankfully the client here said they did want to continue, so I gave them a revised estimate delivery and ordered the replacement parts which should turn up this coming week.
As I opened with, things do go wrong: I hate that this happened, and I’ve been kicking myself about it all week. But I can’t let this stop me moving forward: I do everything I can to prevent mistakes being possible, but with hand made things you can’t eliminate error, particularly when working with organic materials like wood. What you can do is learn from the mistake and keep trying. Here I learned that in sanding you need to not just focus on the bit with the marks you’re trying to remove, but continuously check more broadly as wood doesn’t always behave in a uniform manner. I kind of knew this, but just didn’t consider it in this scenario before.
As an aside, note the damaged neck can be saved I think: I’ll just trim the face of the headstock to be uniform in depth and then glue on an appropriately deep veneer to get it back to size. However, that’ll then have to be used for another guitar, as that’s not what the customer expects for this build.
More necks in progress
This week was short on time, due to needing to travel around the country later in the week, so I only got a small amount of time in the workshop after the week’s opening misadventure. Given that commission #10 was halted whilst I waited for more material, I did some more work on the other two necks I have in flight right now.
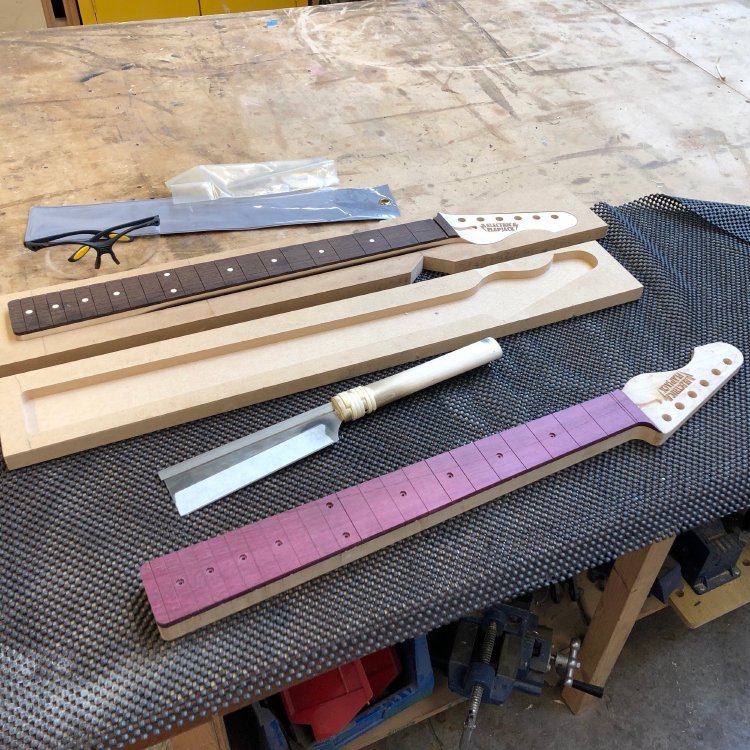
On the neck for the Corvette model, I resumed cutting the fret slots. This is slow going, as it turns out purple heart, whilst pretty to look at, is quite tough. It’s better to work with than wenge, in that it is at least uniform in texture, where as wenge, as seen in the other neck in the above picture, is a mixture of soft and hard, which causes your saw blade to jump suddenly. Despite its uniformity it was slow going, and I got most of it done before getting a risk of a blister due to how I was holding the saw so tight, and left it to complete next week.
I also made a start on the frets for the first neck I was making with my new hand-built technique.
In the past I’ve struggled with wenge fretboards when it comes to inserting the frets, as the tough bit of wenge is very unforgiving when it comes to inserting the frets. This is in part self inflicted: I cut the slots very narrow, 0.3mm, so that I don’t need to use glue to keep the frets in. I could use a slightly wider groove, 0.5mm is common, but then I have to use glue. Given that glue is quite common, why don’t I use it? Firstly, it’s messy, and if you put too much on it’ll leak and get into the wood grain which is hard to then remove. Secondly, in an ideal world the guitar will live longer than a single set of frets, and at some point someone will need to remove the frets, and that is easier if there’s no glue. I’m building with an eye to the person maintaining the guitar a decade from now!
However, whilst this technique I have works okay on maple and rosewood fretboard, with wenge (and I assume I’ll soon be adding purpleheart to this list) the unforgiving nature of the wood makes hammering the frets in quite tough to get in, and requires then a lot of levelling. So this time I’m using some refinements to the usual technique of cutting the fret to length and then hammering it in until it’s settled. It now goes:
- Cut fret slot with 0.3mm Japanese pull saw
- Use a small triangular file to give a slight chamfer to the slot, making it easier to get the fret to slip into the slot
- Bend fret wire to have a slightly tighter radius than the fretboard itself, so that you can get it home at the edges first, making it easier to ensure the fret goes in the slot straight
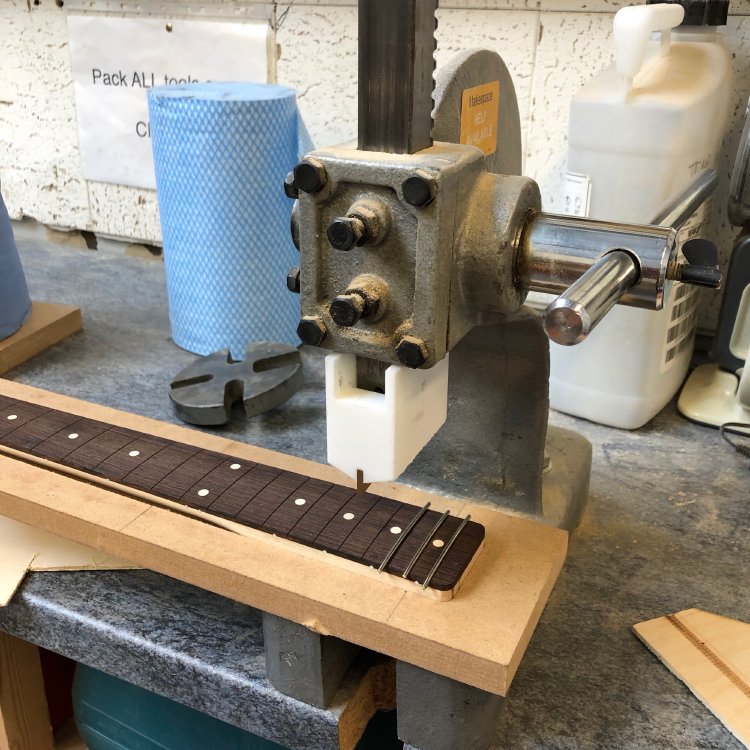
- Use the hammer to get the fret halfway into the slot, starting at the edges and working in to the middle
- Use an arbor press with appropriate bit to push the frets home
Thus far this has made getting the frets in, and in properly, much easier. It’ll be interesting to see if this makes levelling the frets less of a pain, as in theory they should now be more uniform in shape than just hammering alone.
Again, due to limited time I had to stop this with just half a dozen or so frets completed, but I was happy with the progress I had made.
Friends and Family
The rest of the week I was off travelling, driving from Cambridge to Glasgow to Liverpool and back home over four days. First it was up to Glasgow, to see my Dad graduate from his Open University degree in law:

My Dad’s been working very hard for this for a long time, so it was great to see him graduate, I’m both proud of him for his effort and of my Mum who’s supported him in this for many years. The graduation ceremony had a much more celebratory feel than the ones I attended at the University of Glasgow back in the day, I think a reflection of the very different path the students took to getting their degrees and how that makes the meaning of graduation very different here.
There was a very wide range of ages represented here, from young to old, and it’s a reminder that if you can find a way to make it work, it’s never too late to learn. All of these graduates were here despite having to either raise a family or hold down a full time job, or both or any other of the commitments we have placed upon us in later life, but still they have found a way to add a new facet to their skills. It certainly gave me a greater appreciation for the work the Open University do and the opportunities they create for people.
I guess it also resonates with me as in part that’s what I’m doing with this guitar building and related activities: learning and growing outside the conventional structure of school then university. Hopefully these notes I put here each week will encourage others that they can do the same, be it in this discipline or another that they’ve been wanting to try. It’s never too late to push yourself in a new direction, it’s just harder to arrange.
Whilst in Glasgow I crashed over with my friend Dave, who has guitar #3, The Red Rocker. It was nice to spend some time hanging out with Dave, who I’ve known since high school, and have a bit of a jam (I’d taken along guitar #1, as it goes everywhere with me :). It was also nice to spend a little time with guitar #3 and reflect a little on how well I think it still holds up despite how I’ve grown as a builder over the last couple of years - whilst I’d approach things differently now, and I never think anything I’ve built is perfect, I’d still be proud if I built a guitar today that had that end point.
Festival of Maintenance
My stop in Glasgow was fleeting however, as at the weekend I was being a support volunteer at the second Festival of Maintenance, this time held in Liverpool. As with last year, there was a wonderfully diverse range of talks on the topic of maintenance, ranging from how to build maintenance into our economic systems, maintaining clothes, maintaining botanical museum samples, and maintaining roads and bridges, with each talk from an expert in that area.

It all made me feel a bit bad that I build guitars more than I fix them, but that’s not for lack of trying. I do keep an eye on second hand shops or ebay for broken guitar bits, but nothing ever appears in the bounds of totally wrecked to mildly wrecked, and anything that just needs light work will be snapped up quickly by people. I imagine most of what I’d be interested in ends up in the bin - though if you have a decrepit guitar that needs some TLC, let me know!
All the talks are online in raw livestream format right now, and will appear in bite sized snippets shortly. I can definitely recommend having a look at the schedule and finding a couple of talks to view on topics that interest you!
A big well done to everyone involved in organising it and to the speakers. I look forward to next year!