A week in and out the shop
15 Dec 2020
I seemed to spend most of my time this week laser cutting things. I started by cutting both the cavity templates and the pickup mounts I designed earlier in the month.
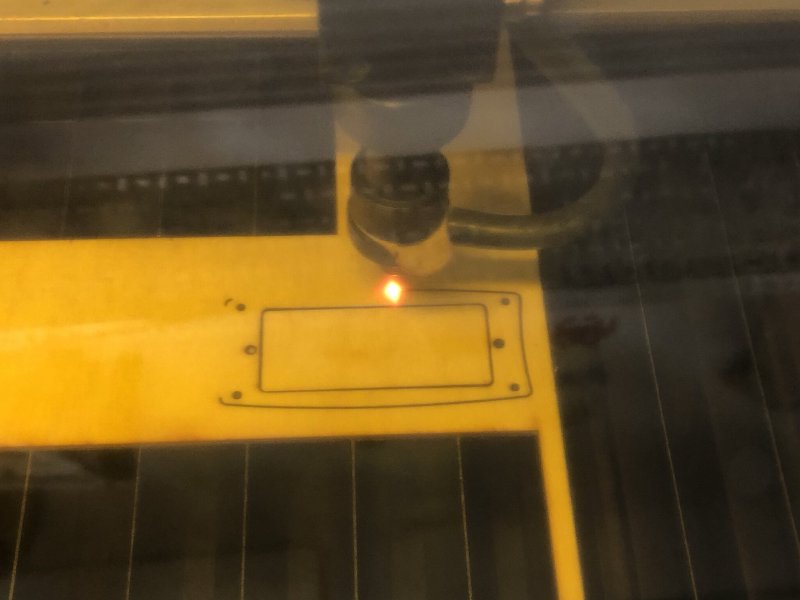
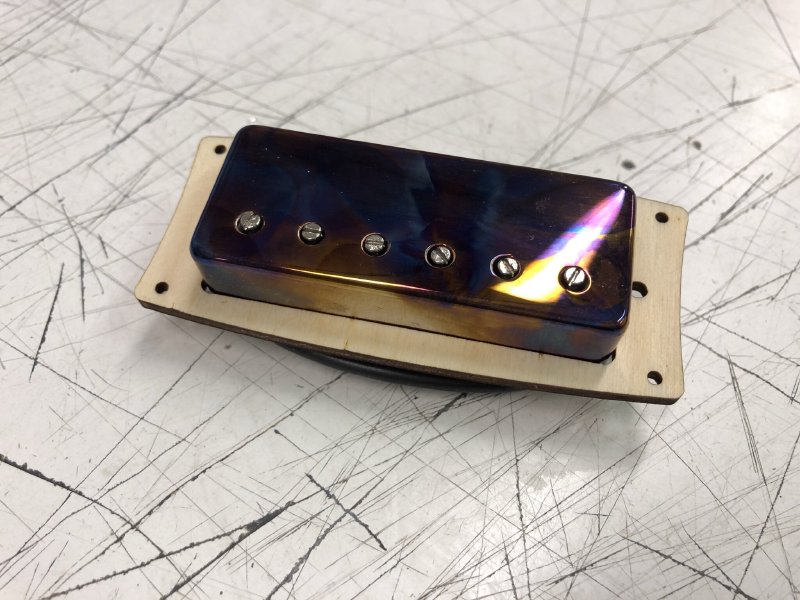
As ever, I did test cuts in scraps of ply before cutting the templates in thicker 10 mm clear acrylic. The pickup mounts I left in ply for now until I get to the finish stage for both guitars, so I can decide on the correct material to match their look. For now, I’m happy just that they fit perfectly onto the lovely pickups House of Tone have made me:
I also did a couple more pick-guards for my workshop mate Matt at Fidelity Guitars. What’s nice about this is that now I’ve got a library of designs for Matt’s pick-guards that I have converted to be ready to laser cut, so this has become a bit of a turnkey operation now, which is nice.
I also did some laser cutting for another local luthier, Jamie Swannell, who makes some of the most amazing acoustics (certainly the best ones I’ve ever played). A while ago Jamie asked if I could laser etch his logo into the material he uses for the face on the headstock, along with the markers for the tuning pegs etc. You can see an example on this guitar here.
As with Matt’s pick-guards Jamie provided an initial design, and I did the work to convert that to a format that I can use with the Laser Cut software I need to use, but unlike Matt’s pick-guards, this one isn’t as turnkey, due to a combination of us etching the logo and the variable nature of wood and laser cutters.
For Jamie’s logo we’re trying to get it burnt into the wood deep enough to be distinct, but not too deep it goes through the thin bit of material on the face of the headstock (usually a couple of millimetres), and if we turn the power up too much the edges aren’t distinct either, so there’s some magic combination of power and speed on the laser cutter we need to dial in for each bit of wood.
And it’s not just each type of wood needs a different setting - though that certainly is the case that the settings I use for say walnut (as I did this time) and the much tougher almost fossilised bog oak I’ve done in the past are quite different. But even two bits of walnut will have some variance that can make a difference between a nice distinct etched logo and something that has burnt too much or isn’t deep enough that sanding wont damage it. Thus I end up with test pieces like this as I work through the laser cutter’s settings to get things just right:
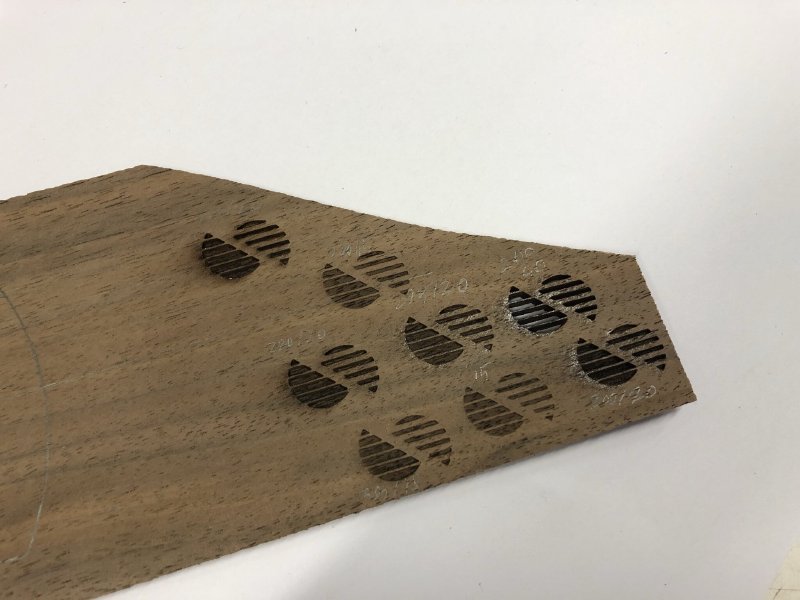
For each one I’ve marked in pencil the settings I used so I can go back to a setting later once I work out which one I like the best. The other thing you learn when doing this is things don’t react in a linear way like you (or at least I) intuitively feel: small tweaks to say the power can make a big different to the burn, particularly if you’re at the ends of the power range for the laser cutter.
When cutting edges I have to do a similar process to match the laser power to say the acrylic, but it requires much fewer iterations.
When Jamie passes me the wood over, he’ll have sketched out where he wants the headstock to sit within that piece just to get the grain just right and so on. So I have to make sure I laser in the right place, so I’m back to my usual trick with taping paper to the bed of the laser cuter to let me mark out where the centreline for the neck is and the location of the nut, and I then match these with the pencil lines Jamie has drawn on the wood to guide me. Then, after making sure I adjust the bed height between lasering the paper and inserting the wood, I have to just press go and hope I remembered to turn off the guide lines in the design before I laser the final marks for the logo and tuner locations:
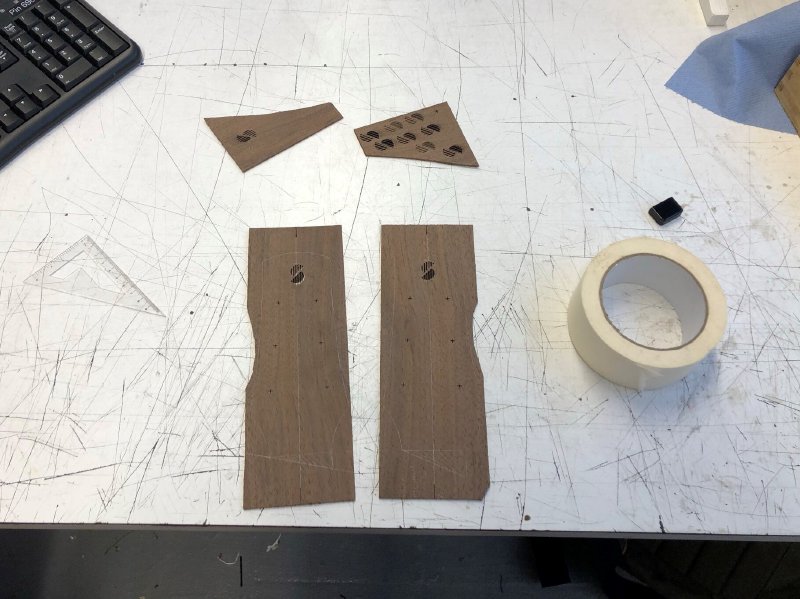
Thankfully the second bit of walnut behaved similar to the first bit, so I only needed to do one test etch for that. But that’s not something you can rely on, so it’s always worth doing.
As long time readers may note, this is a similar process to that I use when lasering the logo and fret locations on the necks of my own guitars. In theory I’ve done this enough that I should be an expert, but it’s something that never seems to get any less nerve-wracking, as once you start the machine going, you’re committed.
I still have one more to do for Jamie, which will be in a different wood again, so a whole more logo testing is in the near future.
I did briefly make some dust, where I cut the neck pocket into the cap on the prototype guitar’s body using the new low profile router bit I bought:
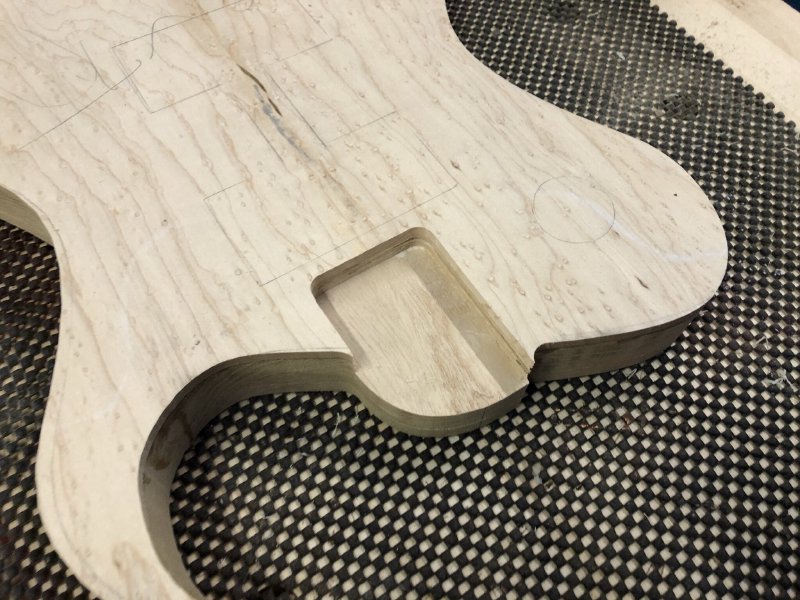
The router bit worked well, but once again I was caught out by the very soft nature of the poplar I’m using for the main part of the body under that nice maple cap. If we take a zoomed in look on the neck pocket:
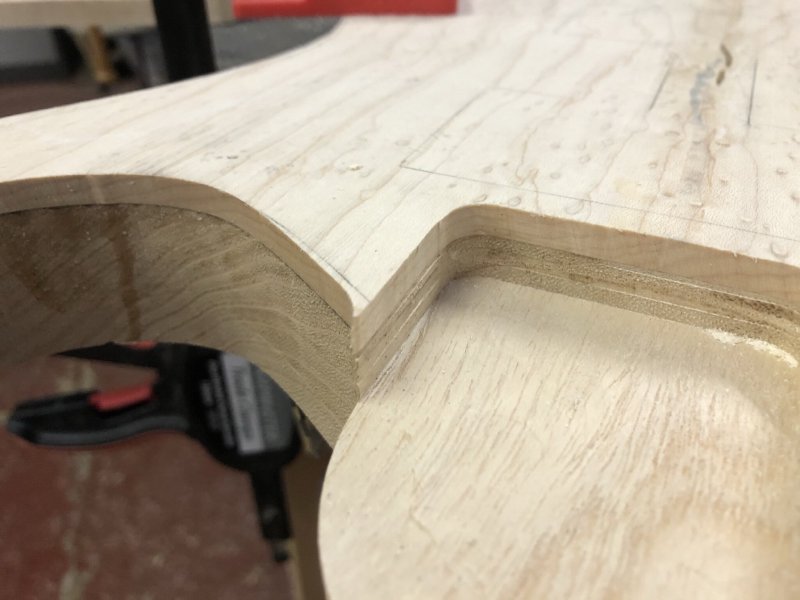
You can see there is a series of ridges along the walls of the neck pocket, and they were much more pronounced before I used a chisel to tidy them up. What happened was that the bearing on the router bit that was running along the pocket already cut into the lower poplar body was actually squashing the softer wood whilst I had to press into the much harder maple to get it to cut, so cutting further in that I intended/expected. That ridge is caused by the gap between the router blade and the bearing, which is where material was neither squashed or cut.
What this means is that I both cut too much material out, and I didn’t do so in a straight line as the poplar squashed by different amounts depending on how I was pressing on it as I trimmed (oblivious to what was happening under the cap). You can see this when I put the neck in place:
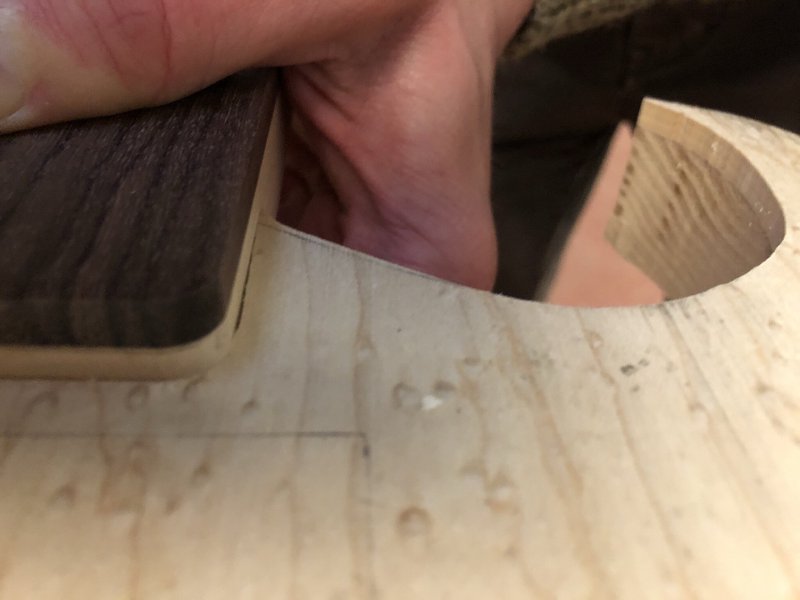
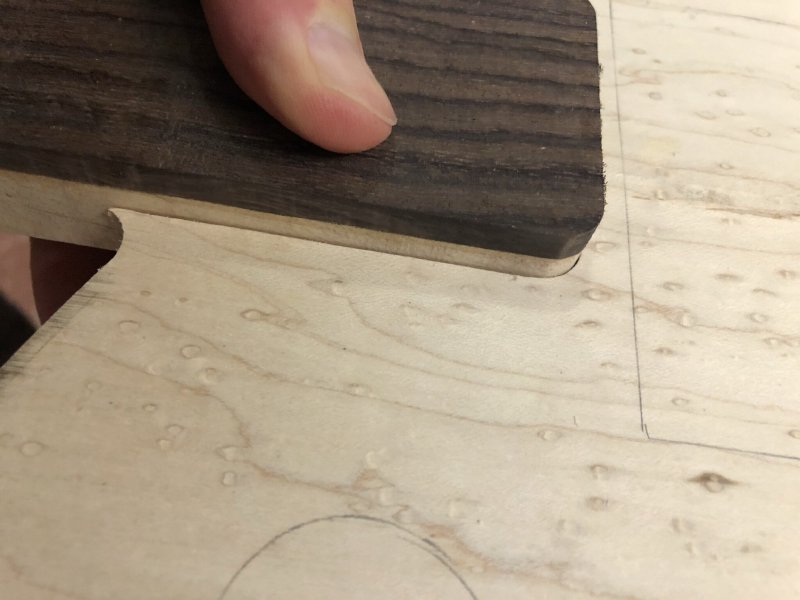
What should have been a tight fit now has this triangle gap in it that I need to patch. You can even see how it shows how I did one pass with the router most the way down the neck and slowly squashed it, and then the last bit was cut from the other direction where I didn’t apply as much pressure. The other side is less obvious, but still not as straight as I’d have hoped:
Whilst I can patch the gap, I think now that this body is going to not ship, and I’ll start it over again shortly with a less soft wood. I’ll still use it to finish testing my build process, but given how easily damaged the poplar is, I don’t think I can ship this body and have confidence that an owner wouldn’t return it very quickly due to it picking up too many dings. On one hand it’s always sad to work on something and then have to park it, but I’ve learned a lot on this body (and will continue to do so) so I’m happy overall despite the frustrations.
Unfortunately my week in the workshop was cut short: at the end of the week I was bit by a dog, which lead to such exciting things as getting a tetanus shot and being put on antibotics that left me drowsy, and thus not in a fit state to wield hand-routers and the like. It feels like 2020 isn’t giving up just yet on the ways it wants to stop me getting guitars built!
Still, I did use some of this forced down time to do something that I’ve been meaning to do for ages, which is take the javascript fretboard generator I wrote a while back and convert it to a Fusion 360 script:
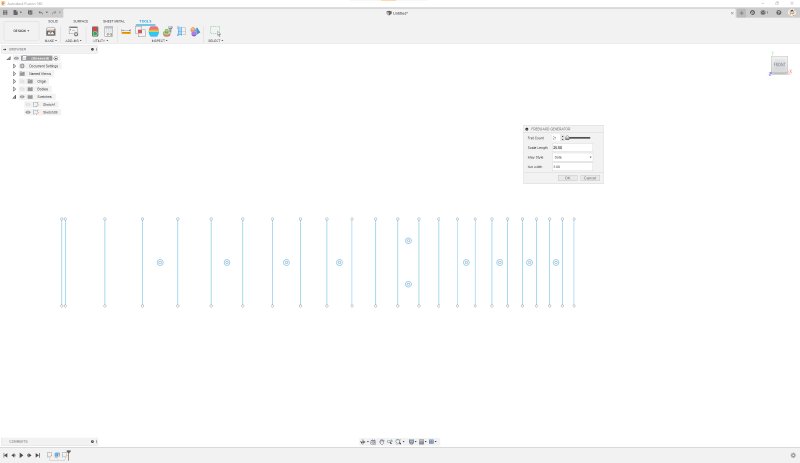
It’s not the most exciting screen shot, but it’s early days!
It’s very much in an early stage, but the code is on github if you want to play with it. At the moment it just generates a simple sketch, which isn’t suited to anything other than being a guide. I’d like to make it better suited to CNC manufacture, as I know a lot of people will cut their fret slots using a 0.5 mm bit, and to generate something parameterised if possible for things like inlay size and fret slot width (though not the fret spacing, you’ll always need to re-run the script if you want a new scale length). But given I’ve been meaning to do this for a long time, I’m happy for now that I just got the ball rolling on this one and I have something to share.
In 2017 I was fortunate enough to attend the Open Hardware Summit, an annual event run by the Open Source Hardware Association (OSHWA). I say fortunate, as it was held in Denver, and since that one time I’ve not been able to justify the expense to travel for it again. But it was a good day of inspirational talks, ranging from open hardware used in digital manufacturing on site in disaster relief zones, for connecting remote communities where it isn’t economical for telcos to do so, and for monitoring rainforests. There were also some lighter themed talks that were no less interesting - the one of an open design for a Jacuard Loom was particularly memorable. All the talks were at a fairly high level, so you got a broad overview of a diverse set of applications of open hardware without leaving you bewildered.
In 2021 it is happening virtually, and tickets are on early bird discount before the end of the year, so I’ve signed up for that, as it’s something I’d like to get into more still.