Santa's delivery catch up
Published 7 Jan 2022
Tags: 3d printing, älgen, branding, fusion 360
Santa has been delivering goodies for the new guitar build, so time for a quick weeknotes to celebrate!
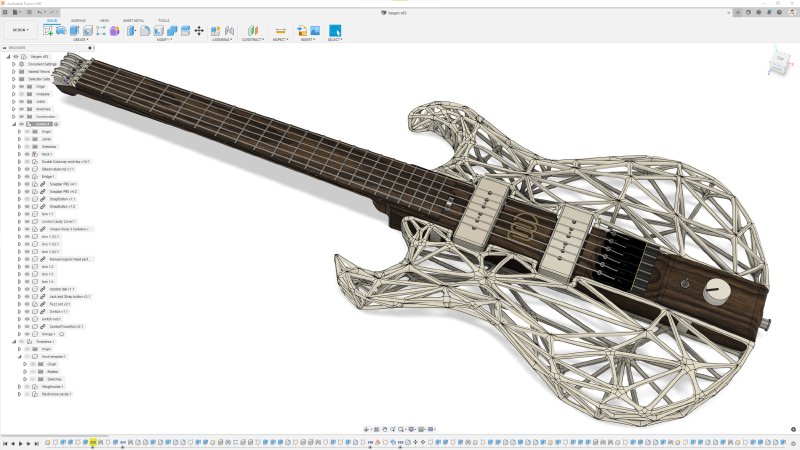
As alluded to in the opening, the main event this week has been that the 3D prints I ordered just before Christmas have arrived, and I finally got to see the new guitar design made real:
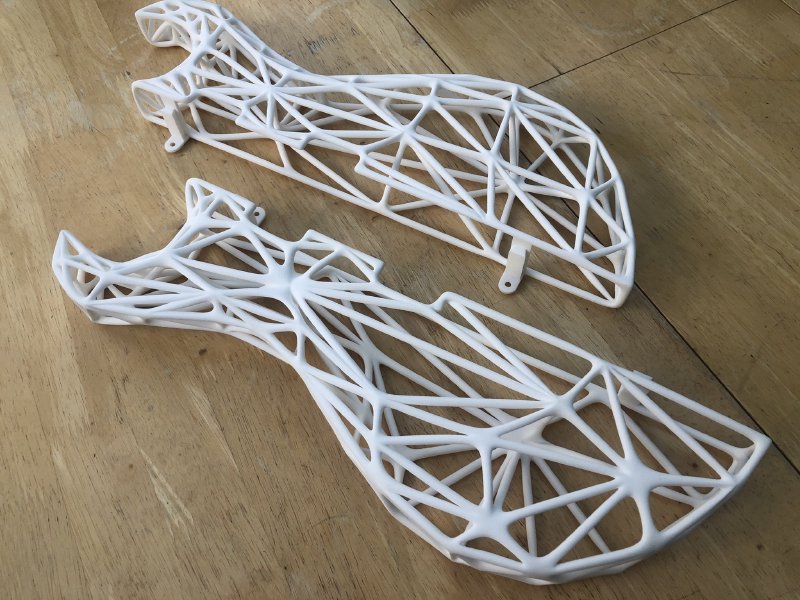
These are not the biggest 3D prints I’ve ever had, I got an entire conventional guitar body 3D printed once thanks to a Fusion 360 community day held at the University of Warwick a few years ago, which is what planted the seed in my mind for this guitar. But it is certainly the most money I’ve spent on a 3D print :)
My main concern with the design when I placed the order was whether they’d be rigid enough or not: although the nylon 12 material at the diameters I’m using is quite strong, I was concerned that over a large length it might have too much flex in it, so that if you sat with the guitar on your lap or put it in a regular stand it might prove too flexible to properly support the instrument.
But now I have these in my hand, and I’ve tried bending them a bit, I think are going to be fine. Along the outer edges, where there’s a higher density of struts, they’re suitably rigid, and closer to the centre, where you have the front and back planes made of longer and fewer struts, the extra struts I added between them stops things flexing too much: without this last minute change to the design I do think they’d have been too flexible, so I’m glad I did that.
Getting these prints made was an expensive gamble, but thus far it seems to have paid off. After all this time it’s a bit weird to see them in the flesh: now I just need to crack on and make something for them to attach too!
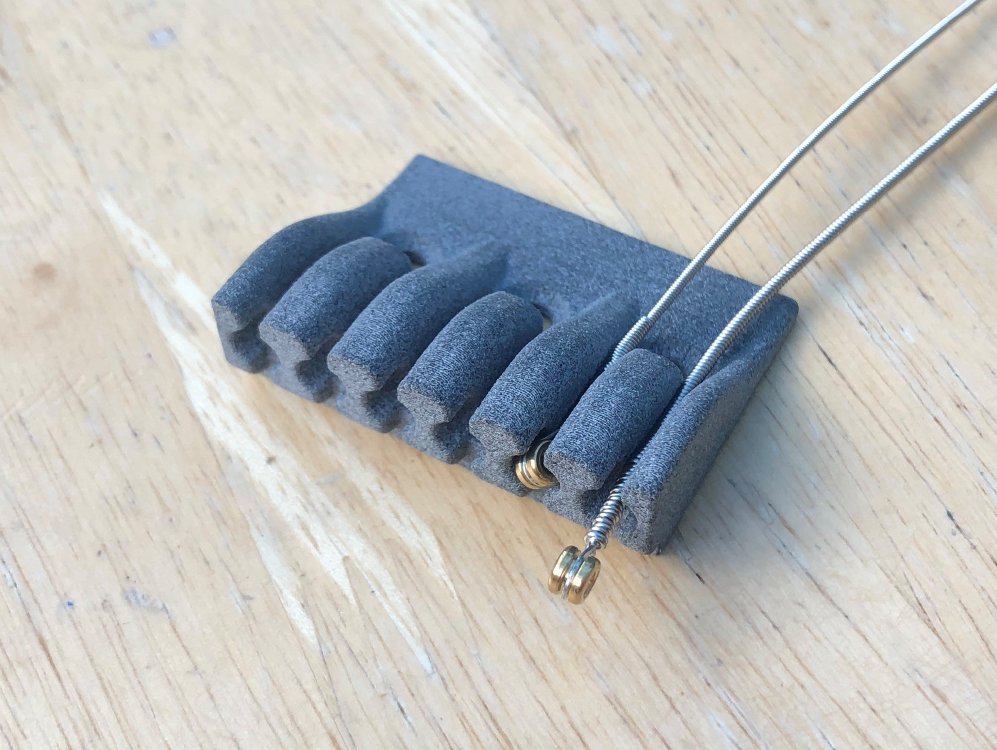
The other 3D print that arrived at the same time was another iteration of the headstock part, where the strings will anchor at the top of the neck. This is my third print of this part, and it’s nice to see the evolution of the part’s evolution over time, going from left to right in the below picture: I’m leading the rapid prototyping dream 😁
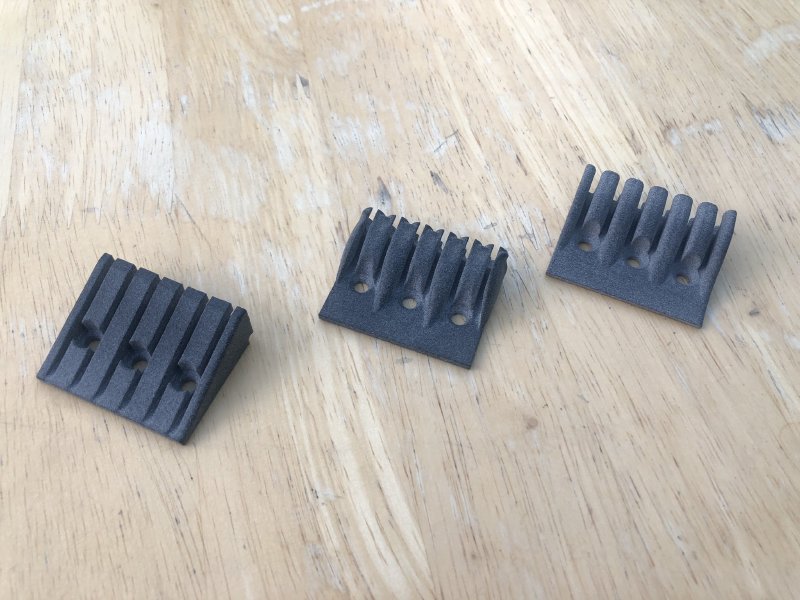
The issue I hit with the last version was that the slots for the strings were too narrow when you allowed for how the strings are wound over themslves at the ball end, so the first thing I did was gave this latest version a size test, both with my regular sized strings (which hadn’t worked with the last design), and I had also got some “worse case” strings for testing with, a set of chonky 12s. The results were mixed:
The thickest string on normal strings I put on my guitars fits fine, but the largest string on the chonky 12s does not fit: so for all of those wanting to know “will it djent?”, the answer is unfortunately no, not with this iteration.
But whilst I still need to make it slightly wider in practice, as a first pass I’m good go to with this as a prototype, as I’ll be using the more regular strings. I’ll hold off ordering an aluminium print until I’ve mounted this plastic one on the body to check for any other surprises size wise, but otherwise I think we have something we can run with for now.
Looks wise I still think the first generative version looks the best, but this new manually modelled version certainly is better suited to the design than my first manual attempt that looks like a pencil sharpner. There is however a slight visual artifact in the print that I hadn’t expected: a line that you can just see in the above picture that runs across the part where the ramps end. This is in the original model, but I thought it was a subtle enough transition that it wouldn’t be so marked when fabricated, but it turns out I was wrong.
I’ll need to smooth that out before the final iteration.
At the end of last year I thought I’d got my templates all sorted, but when I went to head off to the local makerspace this morning to cut them, I realised I’d not ran them through Illustrator to tidy them up yet, and so I was delayed by having to spend more time on my templates today. This wasn’t helped by Illustrator having had an update that moved all the things I use around - not what I wanted to find at 6:30am before dashing into the makerspace.
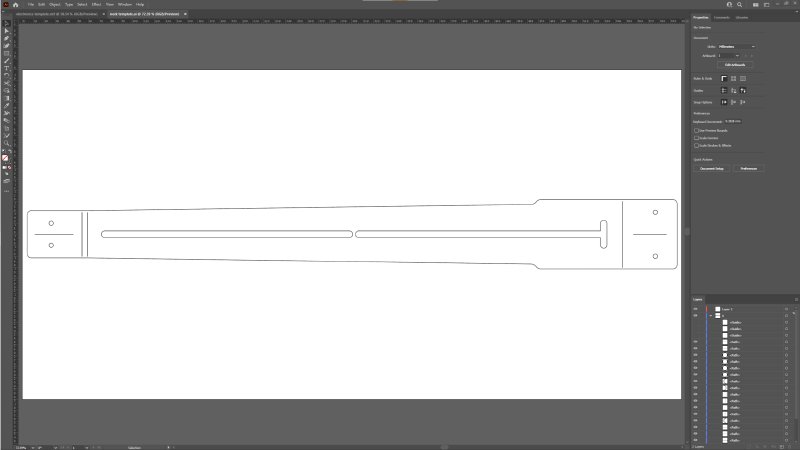
This is all as a result of the untidy workflow I have with laser-cutting things from Fusion 360 using the awkward laser software I have to use with the particular laser-cutters I have access to.
If I was just doing an outline template then I could use the excellent DFX For Laser plugin for Fusion 360, which generates a DXF file that works with the old and fiddly laser-cutter software. But for these templates I also want to mark centre lines and such, so I’m exporting the actual sketch from Fusion 360 directly, and the DXF that Fusion 360 produces like this isn’t directly compatible, as it uses newer DXF features than the laser-cutter software allows for.
At the same time, I sketch in Fusion 360 isn’t exactly what I want to laser-cut anyway, as I need to adjust some of the guide lines, and that involves time in Illustrator to clear that up. It’s not the best workflow, but at least it gets there in the end, and the templates I get as a result justify the extra effort (which hopefully I can show you next week).
All of which means no workshop time this week, which is a bit frustrating, but just how it goes at times.
Given lack of workshop time I did invest some more time into my CAD model to tick off a couple of minor things I had on my todo list. Firstly, I wanted to try putting my new logo onto my Älgen guitar design.
One side-effect of the guitar not having a contentional headstock is that I can’t put my usual mark on the guitar in the usual place. I’m not hugely fussed by this, but I need to remember that if I want to keep making guitars I need to help people work out how to commission them if they see them, so branding has a use.
One decision I took a while back was that I’d drop the usual ⚡Electric Flapjack⚡ logo for these guitars. Visually I don’t think it matches the new aesthetic, and I wanted to try playing with a simpler identity on these. Given the Älgen guitar is a bit of a restart, it feels appropriate to let it have a brand identity that better suits the design.
Late last year I spent a while playing with different branding designs and I had fun riffing on my initials in a way that would enable me to make them using a variety of different tools: laser cutting, routing, stencils, etc. Mostly this means I can’t have islands in the design (as this wouldn’t work for a stencil), and I can’t have sharp corners anywhere (because you can’t make a sharp internal corner with a router).
This is where my idle playing took me:
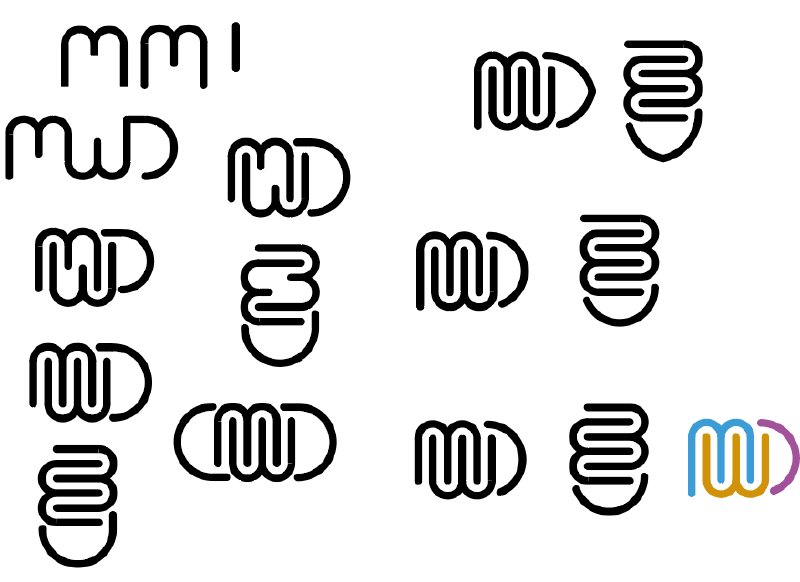
Eventually I settled on the version in the bottom right (though not necessarily in those colours). I kinda like this as it manages to both convey my initials, but also is suitably abstract that you can just see it as some squiggles in a shield like shape.
So rather than the old Electric Flapjack logo, this is what I’ll run with on the new guitar. What do you think? An improvement or a step back? I might hold onto the old logo for my more convention builds, as I’m not sure this one works as well in that context, but we’ll see.
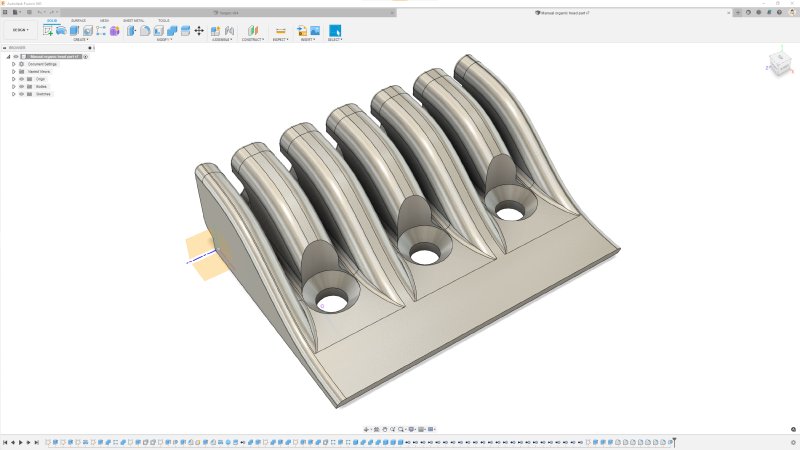
The other thing I fixed in my CAD model whilst trying to place the logo was to add strings! In Fusion 360 I tend not to draw things like strings, or bother with non-machine necessary details like rounding the rear of the neck, as I carve that by hand. I do just enough to let me get a general impression of how the guitar will look and have all the details necessary for manufacture, and nothing more as CAD can be a bit of a time sink.
However, in the past my friend Jonathan, who does product rendering and thus has an eye for details like this, had pointed out to me that my renders were missing the strings, and this week observed that when trying out the logo, given I was proposing to place it behind the strings, it was hard to get a good impression of how it would sit from my renders. So, given I had some extra time today, I gave in and added strings.
The reason I put off doing them was because they have an annoying irregular shape as they rest over parts of the guitar rather than join cleanly, which also makes them a pain to attach to the model, and for something not needed technically in Fusion 360 for any CAM I do, this seemed a poor investment of time. However, it turned out adding them was surprisingly easy having thought about it for a little while - doh.
The solution was to not try and cram everything into a single sketch, but rather I created a series of sketches for every place the string touched the guitar: a sketch for the nut slots, another for the saddles on the bridge, one for the headstock anchor points, and one for the bridge anchor points. In each of these I projected the relevant part from the model and then just added a point - literally just a dot in space - for the center each of the strings. On just one of the sketches I also added a circle per string too, with the circumference of the string it represented.
Having done that, I could then create one final sketch, and use the fact that Fusion 360 will let you sketch in 3D if you have suitable reference points, and now I could just literally join the dots from all the other sketches I’d made.
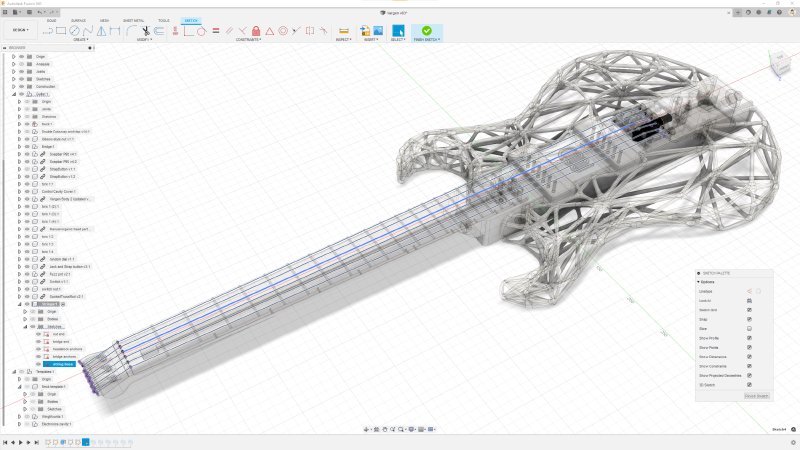
Once I’d done that, I could then use the Sweep tool in Fusion to take that circle I’d drawn, one per string, and “sweep” it along the lines that made up the related string. Clear as mud? Hopefully that makes some sort of sense :) It sounds like a lot of steps, but in practice once I realised how to approach it adding the strings just took a few minutes. Hopefully this description will save someone somewhere some time.
So, as is indicated by the above pictures, I suspect I’ll put the new logo between the pickups, using some colour material that isn’t too contrasting with the walnut wood I’m using for the body. The idea is that I’ll route out the space for the logo then then embed another material in there, just like an inlay on the neck would be made. Most likely I’ll use laser cut wood or acrylic, to provide the inlay, though I could also try clay. Basically I just want something that’ll not pull the eye to the logo in general, but will be there if you look for it.
The only annoying thing about this plan is that I suspect I’ll need to use a CNC router to achieve the initial logo cavity, as the logo is too small for me to use a conventional template approach using something like a palm router. But then I guess using the CNC router just for the logo isn’t that different from using a laser cutter to etch the logo as I’ve done until now: both are done by gcode rather than by hand using very similar mechanisms. It’s just slightly vexing to me that the wooden part will be made by hand without a CNC router up to that point - which is kind of ethos I want for this guitar - 3D printed futuristic manufacturing merged with traditional hand crafting.
If anyone has any suggestions on how I could achieve it otherwise do let me know.