A week barely in the shop
Published 15 Oct 2018
Tags: 3D-printing, CNC-router
This last week I got to spend very little time in the workshop, which was frustrating, but I’ve had one contracting job enter a crunch phase and another just kick off, so last week was hectic, and the weekend was spent visiting family. I hope this coming week to carve out at least one weekday and some of the weekend to be in the workshop. The two offsets are nearly over the hill in terms of the more risky bits of assembly.
I mentioned the recently that the client who commissioned the first offset, now called The Clydesdale, wanted to do a custom headstock design, and he’s now provided me with the artwork for that. I’ll use this to laser etch the name alongside the regular Electric Flapjack logo; it’s nice to be able to offer personal touches like this to the guitars.
The one bit of time I did get to do in the workshop was helping out Jamie from Swannell Guitars, an amazing acoustic guitar builder also based in Cambridge.
Jamie needed some holes made in a bit of wood: sounds easy enough, but he needed 649 holes, each about half a millimetre in diameter, all into a piece of wood about 2mm thick. Whilst in theory he could do this by hand, it’d be very tedious very quickly, and that’s normally (at least for me) when mistakes happen, so this seems a good excuse to break out one of the more automated bits of workshop equipment that are found in the Makespace workshop.
My first instinct was to use the laser cutter for this, as whilst I do have some very small end mill bits I can use on the router (0.6mm diameter), I was worried about such small bits breaking as you cut, and that’s never a worry with the laser, and at 2mm thick the laser cutter will have no issue getting all the way through. I did a test run on paper with all 649 dots first to convince myself that the 0.5mm pitch wouldn’t be an issue on the holes, and then tried a smaller sample on some scape wood.
It cut the holes fine, but the results were not satisfactory: the main problem we hit was the laser doesn’t cut a perfectly straight hole, but more of a v-shape, with more of the upper layer of wood being burned away than towards the bottom of the hole. These holes would be used to hold a wire in place, and so the fact that they were quite tapered let the wire wobble around too much. Instead we turned to the CNC router and those tiny end mill bits I have:
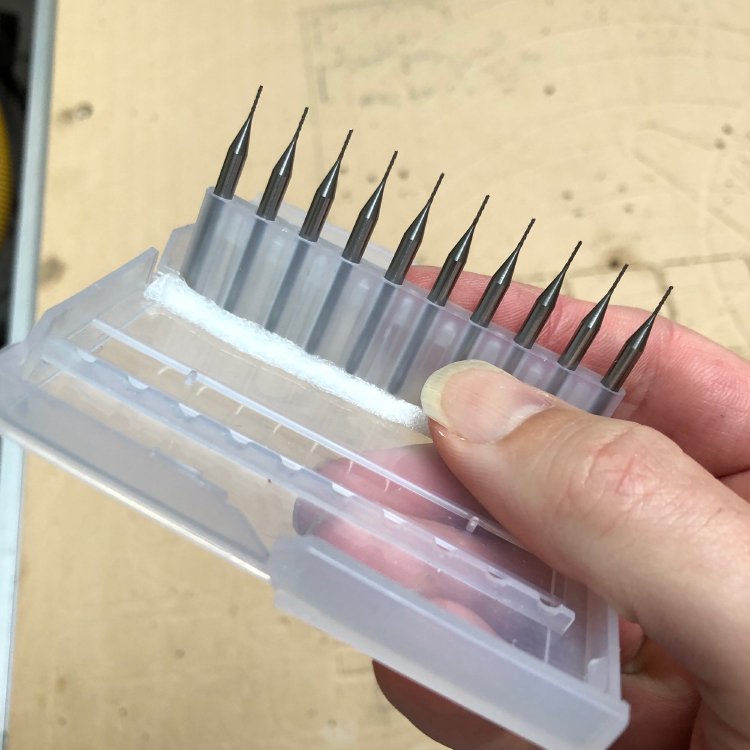
The bits have a diameter of 0.6mm, so just about the right size for what we need, but we didn’t want it much wider. The first problem was just making a 0.6mm hole with a 0.6mm bit like this isn’t going to work: router bits are generally as a rule side cutting tools, not end cutting (as with drill bits), and in my experience if you get a CNC router to drill it moves the head down quite rapidly, which in our case would just break the bit anyway given how thin it is. To counter this I imported the design into Fusion 360 and told it instead to bore a 0.6mm hole and claimed the bit was 0.59mm (Fusion sensibly won’t bore a hole if the bit’s diameter is as large or larger than the hole’s diameter). I gave this a quick test run on some scrap, and much to my amazement the fragile looking bits did exactly what I asked without complaint.
We put in a sample bit of wire, and it held nicely, so in the end we cut all 649 holes using this technique. This did require us manually selecting all 649 holes in the CAM part of Fusion 360, which was quite tedious, but I couldn’t see a nicer way of achieving this quickly, but it got the job done. If anyone knows a better way of doing this then answers on a postcard to the usual address.
Having been on the receiving end of so much help and support from other luthiers and woodworkers, it was nice for once to be able to give back and help someone else out. Hopefully ta some point you’ll get to see what Jamie is working on: it’s going to be pretty special based on what I’ve seen!
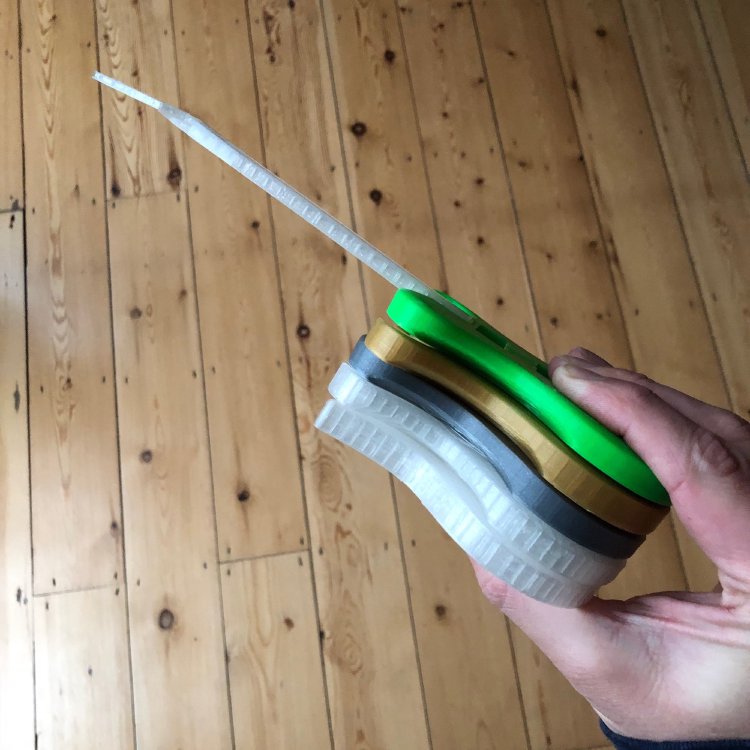
Despite my non-guitar workload this last week I did find time to continue to tweak the guitar designs for 2019 whilst away from he workshop. I’m living the rapid prototyping dream by updating my design in CAD, 3D printing the model at a quarter size to get a sense for how the lines and curves look in reality, then feeding that back into CAD when I have a spare 15 minutes, and kicking off another print again.
At the end I plan on making a poster of how the design evolved from all of these!
One thing that’s important to me is the ergonomics of the top, so I’ve been experimenting with different top carves on designs. I was not very happy with how the initial carve designs looked, when Jonathan Woolf (Makespace general awesome person) pointed out that I was using low res to save time, but for things where you have a non-flat surface like this you want to accept the slow print time and do it at fine resolution. On reflection, he’s clearly right: the top carve is around 5mm in depth of the guitar, and I’m printing them at 25% scale, so I get around 1mm of difference between the top and bottom of the carve and going from the “normal” fast print 0.15mm resolution to the extra fine 0.06mm resolution is the difference between 6 and 16 layers across the carve area, and you indeed get a sense of the subtle curves much more when you use the extra fine setting.
Still some more prints to do, but it’s been a very useful process, and I feel I’m slowly getting there with the design. Of course, I need to clear my backlog before I get to build any guitars based off this work, but it’s the find of thing I want to be ready to go once my backlog is cleared.