A week in the shop
Published 8 May 2018
If I’ve been quiet of late on social media, it’s partly because I’ve been busy doing non-guitar work this last week to help pay those bills, but it’s also because it was not the best of weeks on the guitar front either.
As promised last week, now that know how my offset guitar hangs together with the prototype bits I built, it was time to crack on with making the first of the commissioned bodies. This has been well overdue, but the issues I hit a month or so ago with the CNC router at Makespace going wrong and destroying things had set me back. Since then a lot of nice people at Makespace had put in effort to try and diagnose the issues with the CNC router, and indeed had given it a bit of an overhaul. In the end, whilst there is a general opinion that the CNC router’s controller unit should be replaced at some point, no one was ever able to reproduce the issue I had, and it was felt good to use again, and indeed had been in regular use by others all this time without incident.
So, I went back to make the body for guitar #5, which will be a solid body offset like the prototype I made, but with a hardtail string through bridge, and made from american ash. I made the body blank for this back in February, and now it was time to cut it. The first stage was to spend a couple of hours in Fusion tweaking the CAM model. Because each guitar is slightly different and each body blank is slightly different, it’s never just a case of hitting print from the 3D model: I have to review all the tool paths for each stage, plan out the order in which the cuts will be made, ensure that I’ve got the right bit setup, and that it all first in with the material I’m using.
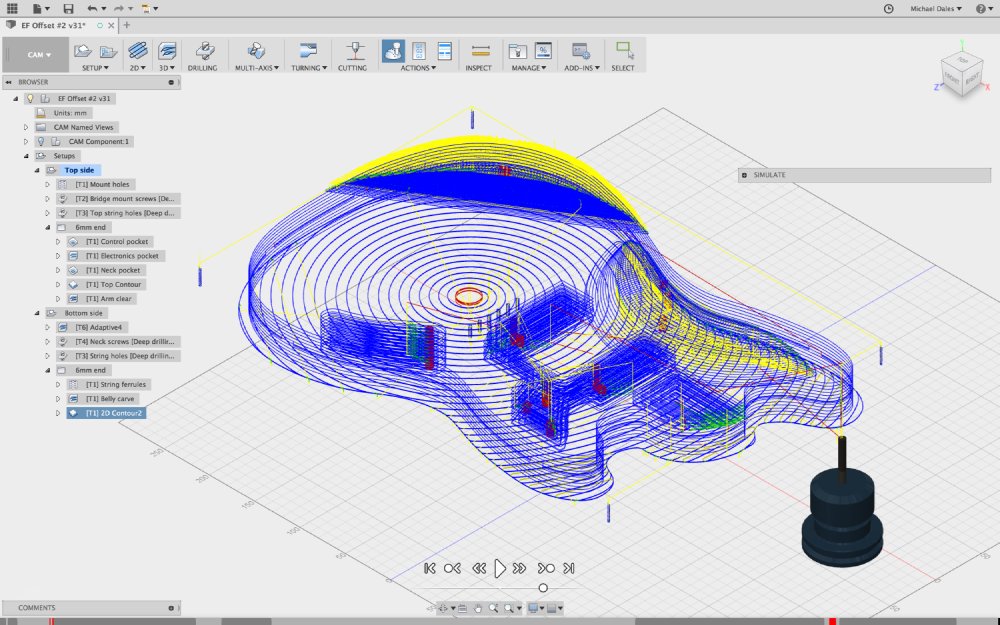
Interestingly the body blank I’d made, which I levelled back in February, had warped ever so slightly in all this time sitting around, which I’d not expected, so I also had to face it off again. This is also done using the CNC router using a very wide bit just to make sure the surface is flat. The variation in height was only about 0.5mm between the edges and the center, but that’s enough to cause a slight wobble on the bed when trying to cut the blank, and if not addressed that’d be enough to make things slightly off. That fixed I then set about cutting the body design out.
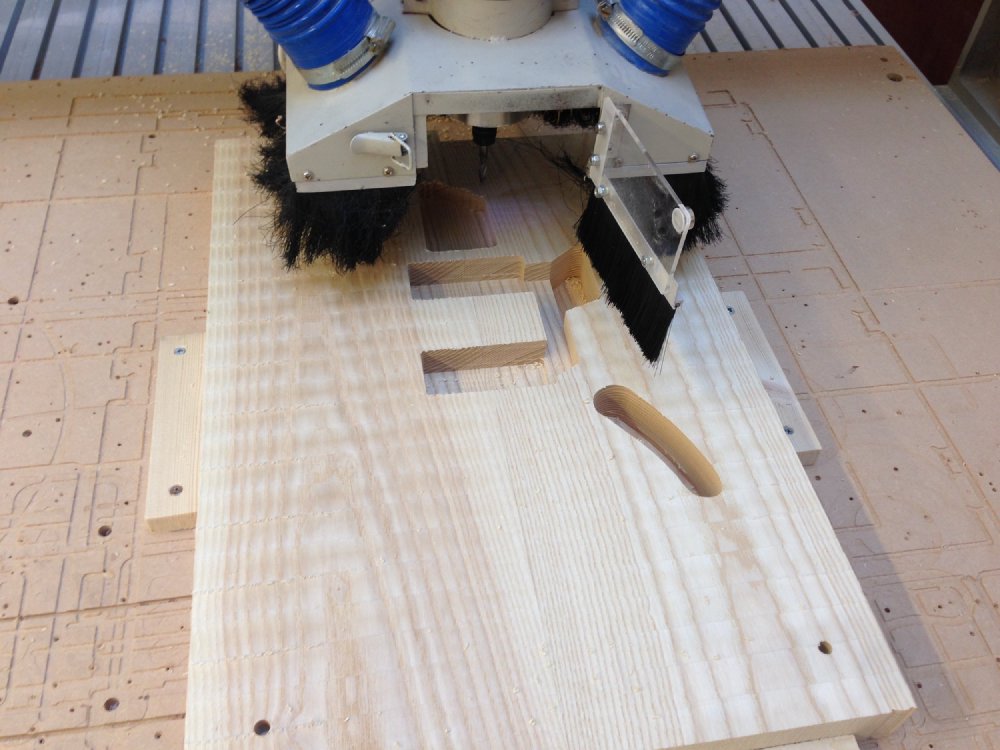
The router was just about finished the top body contour pass, when disaster struck once more. There was a horrible screeching noise, which I knew meant things had gone wrong again and the machine was trying to cut bits it shouldn’t be, and I was quick enough to stop the machine before it had a catastrophic failure like last time, but not quick enough to stop it ruining the piece I was working on.
It doesn’t look like much in the picture, but it’s enough to mean that this body isn’t fit for purpose. That gouge it made there in the upper horn goes most the way down through the body, so it’s not going to be recoverable: this body is now scrap.
I was somewhat heartbroken when this happened. Firstly, although a body blank doesn’t look much, it’s already a reasonable investment to get a guitar to the point you’re cutting the body like this: you have to buy the wood (and good wood isn’t cheap); you have to joint the parts to make a body (I even hand planed this one); you have to thickness it, etc. And all that investment is gone in an instant and you’re back to square one. But secondly, and more distressingly, this means I’m never going to trust one of my guitars to this CNC router ever again: fool me once and all that jazz. This means the method I’ve used to make guitars until now has just been taken away from me.
Initially I was briefly angry at Makespace for not taking more action after the machine failed the first time, but in reality they’re in an awkward spot too. A community workshop is just that, a workshop owned by the community. The directors of Makespace set the tone, and they want to encourage fledgling enterprises like mine to scale up from hobby to something more sustaining, but at the same time most members are just amateurs who couldn’t justify commercial rates required to run machines like with very high uptime. It’s an interesting problem for maker spaces in general, and nothing unique to the one I use; and whilst that debate is interesting perhaps, it doesn’t help me get guitars made, so there’s no point dwelling on it here.
There’s a few options forward at this point. Firstly, I know that the community owners of the CNC router at Makespace were looking into alternatives after the first incident, but given it’d happened once and never again, there wasn’t a particular sense of urgency. Perhaps now things will move forward there more quickly, but in reality I suspect not quickly enough for the two commissions I want to get done right now. Not every luthier has a CNC router though, so I could switch to more traditional methods of making templates for my guitars and hand routing the bits I use the CNC router for. The templates themselves I can make on the CNC router using MDF: although I don’t trust that machine, if it just messes up occasionally I’m happy to burn through the much cheaper MDF than I am expensive guitar wood. But I’ll need to find my own plunge router as the one in Makespace is missing its depth gauge, and I’ll need a new set of bits for this style of building. Or I try find another CNC router in Cambridge I can use, but given the type of people I see using the one in Makespace, I assume currently that sort of thing doesn’t exist.
Anyway, if I’ve appeared quiet on things like Instagram and Facebook of late, this is why: it’s been a dark week for Electric Flapjack guitars having to realise the way you’ve done things until now has to change radically. Ultimately I’ll find a way around it: it’s temporarily knocked the wind out of my sails, but I really enjoy building guitars so I won’t let this stop me. The reward you get when you see someone play a musical instrument you made far outweighs the frustrations of having to change how you do things.
I’m also fortunate that my commissions have been very understanding about the issues that have presented themselves - my first concern when this happened was about the deadlines I’d set for the these builds and how I was going to let people down, so I made sure to communicate the state of things with them, and they’ve been supportive, for which I’m very grateful.
On a more positive note, I think I’ve finally found a path forward for getting my designs in Fusion 360 onto the laser cutter at Makespace, which thus far had eluded me. I could (haha) target the CNC router and the 3D printers in Makespace from Fusion, and the laser cutter was the last thing I wasn’t able to join the dots on until now.
The main issue with the laser cutter we have at Makespace (and at many other similar spaces) is that the software used to drive it, Laser Cut 5.3, is terrible. It has only the most basic of drawing tools in the software itself, so you can’t use it as a design creation tool, and its DXF import (DXF being the standard 2D vector format for exchanging CAD files) is utterly rubbish. For example, in general it’ll accept DXF generated by Inkscape (another tool I’m not a fan of), but getting DXF generated by Adobe Illustrator is something of a gamble each time.
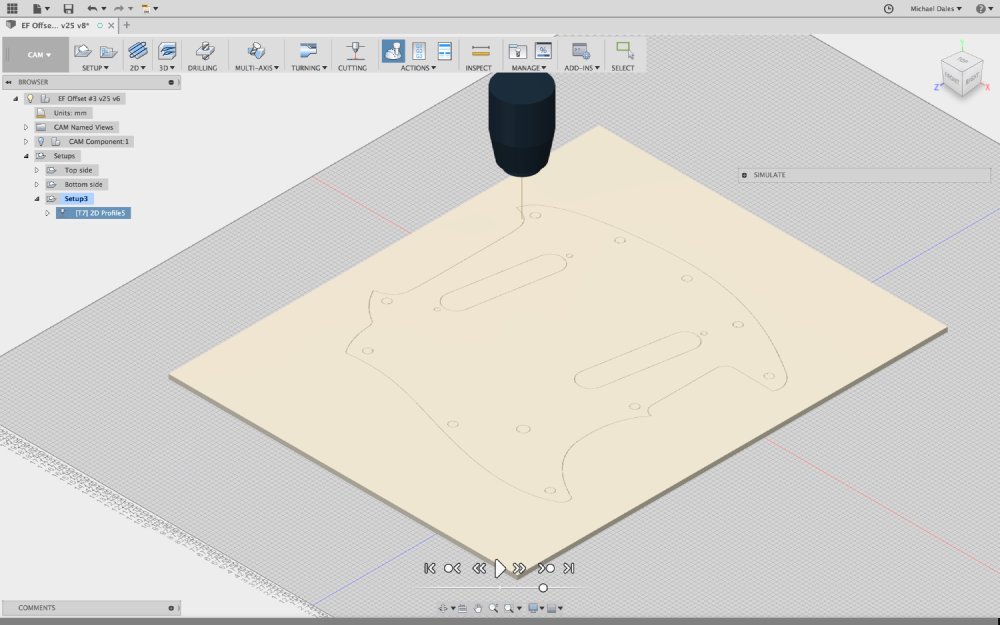
Fusion also complicates matters: you can export 2D sketches as DXF format, or you can export 3D bodies as STL (a 3D vector format), but you can’t export the face of a 3D body as DXF, so if your design is not directly from a sketch, then you’re stuck. As an example, look at this pick guard design I have for the prototype offset I’ve been making:
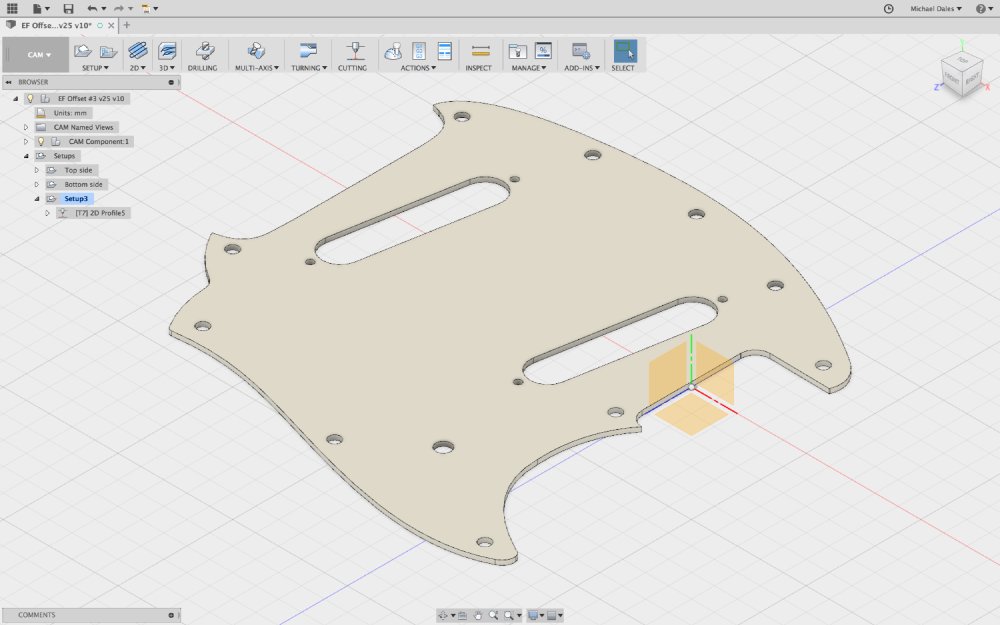
The outline of the pick guard and the screw holes come from a 2D sketch that I then extruded, but the neck pocket and the pickup holes are created from subsequent operations that remove material from that extrusion, which means I have no sketch in Fusion to export that looks like the final design, which means I can’t generate a DXF file to feed to Laser Cut 5.3. In actual fact, it wouldn’t matter anyway, as the DXF generated from Fusion based on sketch doesn’t import (or at least never has for me, and the Fusion 360 forums suggest I’m not alone).
After much playing around and a few dead ends, I finally found a nice simple route for this. You can use the CAM facilities in Fusion to generate tool paths as if you were going to cut it using Fusion rather than Later Cut 5.3, and then rather than generate the machine driving g-code that you’d normally do as a last stage, you use this DXF exporter plugin, which just generates a DXF that follows the toolpath for the thing you wanted to cut, and that DXF files generated by this do seem to import nicely to Laser Cut 5.3.
Clear as mud? So, in Fusion, you can go to the CAM section and create tool paths for laser cutting just as you would for CNC routing or milling. If you want a quick overview, then you can watch the latter half of this video here. But at the final stage when you’d go to what Fusion calls “post processing” rather than selecting the type of machine you have, you select the “Universal Exporter DXF” as your machine, and you’ll end up with a DXF file that’s just got the lines for the paths in that CAM section (this means you can also generate a DXF per tool path if you want). This DXF then (at least in my limited test cases) imports cleanly into Laser Cut 5.3.
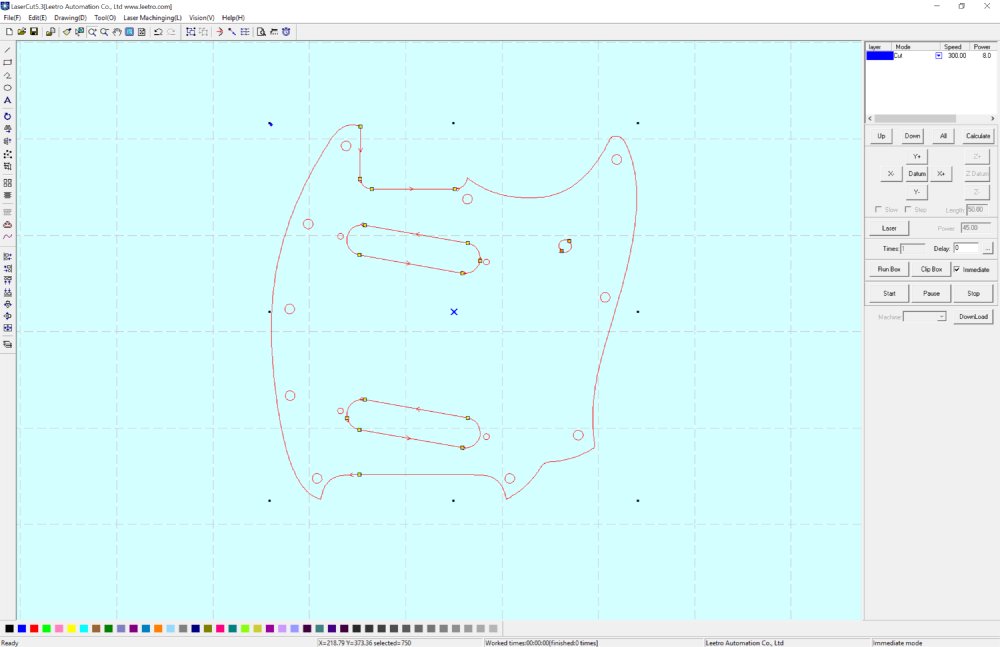
This means I can now cut some test pick guards to check pickup mountings and general positions before cutting the actual things.
As an aside, one thing I learned during all this is that Laser Cut 5.3 has a demo version that you can use at home for testing things like this. Whilst the binary for the full program requires a hardware dongle to run, in the same folder there’s a binary with “_demo” in it’s name that’ll run enough features to let you do some playing around. Given how hostile Laser Cut 5.3 is to use, having a copy that you can practice on away from the laser cutter is great.