A week in the shop
Published 29 Jul 2019
Tags: hästen
A long week notes here I’m afraid, but the tl;dr for those of you who are busy:
-
Wear your PPE all the time
-
Remember that done is better than perfect
-
I also do make some guitar build progress too.
Still reading on? Then let’s get into what was an educational week in many ways, not all of which are ideal.
I spent some time of late wondering how I can make it easier to prototype new guitar body shapes to see if I like them without investing the time required to make a body from scratch on a regular build. In the past I’ve 3D printed some 1/4 size models, and whilst those are good at giving you the idea of the physicality of the guitar better than a picture on a computer screen, you still don’t know what it’s like to hold and play.
Having recently taken to laser cutting templates, I wondered if there was a way I could use the laser cutters available to me at Makespace, and just laser cut some acrylic to the right shape, glue it together to get the right thickness, and then I have a quick and dirty guitar made. It’d need quite a lot of weight relief inside, as acrylic is about twice as dense as the woods I normally use, but it seemed a potential idea. To convince myself it was sensible, I first mocked it up in Fusion 360 so I understood what I’d need to cut out.
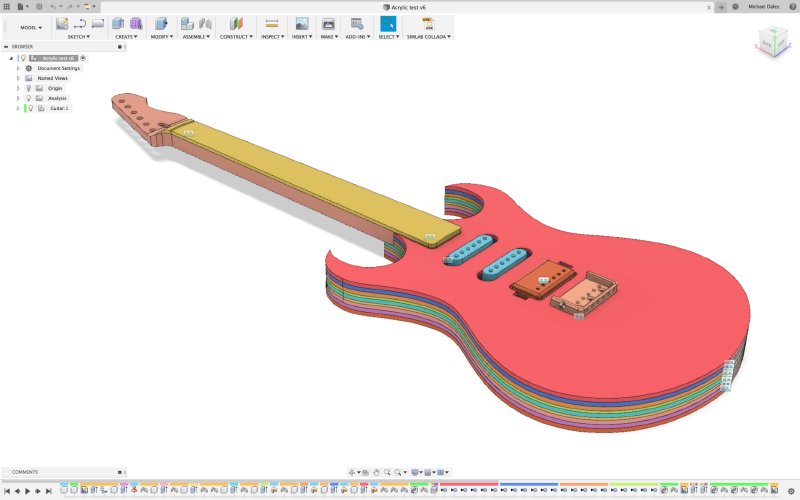
This is not the colour I would make it in mind, though perhaps if someone wanted a very 80s guitar I could do, but rather this is Fusion 360’s analysis mode that shows up different bodies in different colours, and thus you can clearly see here the body made up from many sheets of acrylic. For the first time I took advantage of Fusion 360’s ability to model physical material properties so I could assess the overall weight; this meant I was able to convince myself that if I made this out of acrylic I’d be able to actually lift it. It took a surprising volume of cavities in the body to get the weight to anything close to reasonable (at least, it was surprising to me), but certainly it was doable.
This next section is a lesson about health and safety in the workshop. To save you skipping through al the text: don’t worry, I am fine, but I gave myself a little scare and so I recount this as a lesson I’ve learned so you don’t have to.
With the above design convincing me this was a potentially viable approach, the next thing was to think about how I’d make the sheets of acrylic stick together. I could just bolt them together, but that’s going to most likely lead to bits of bolt sticking out something that will be up against your body, and I was’t convinced just a few bolts would do to stop the sheets moving around given the stressed on the body. Ideally, I’d find a way to “glue” acrylic: so I did some research, and it turns out you can use dichrolomethane to do just that. It’s a fairly common solvent to use for this purpose rather than regular glue; it actually melts the two pieces slightly which then rebond as one. Thus my next step was to test this out on something smaller, so I laser cut some bits of scrap acrylic into shapes I could align with pins, and went to stick them together.
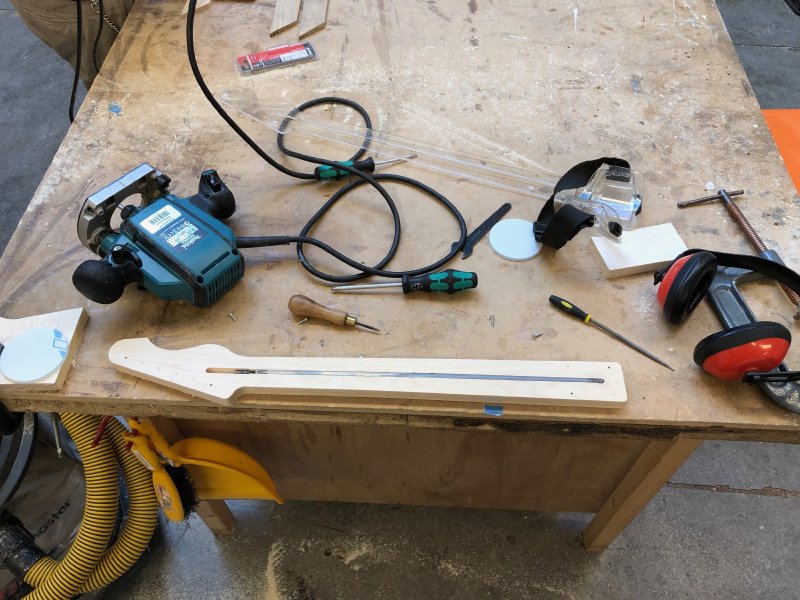
As with any experiment, I got everything I needed together before I started: the bits of acrylic I wanted to test with, clamps to hold things in place, a bottle of dichloromethane (which wasn’t new to the workshop, as other people have safely used it to stick acrylic together successfully), and a plastic syringe to apply the dichloromethane with. I thought about safety, so I moved to the secure workshop out of the way of people who might knock me, and I wore gloves as I’d be holding bits of acrylic with the solvent on them and I didn’t want to get any on my skin, as dichloromethane isn’t the healthiest of stuff (though no worse than other glues or cleaning products I might use).
What I failed to do, as some of you may already have observed, was wear my safety goggles, as I didn’t consider splash risk. In hindsight, this was a particularly silly slip up, as I’ve taken recently to wearing contact lenses to enable me to wear more comfortable safety goggles, and I’ve even bought my own. But getting them out of storage and putting them on before I go into the workshop wasn’t yet habit, and this time I forgot.
As per the videos of how to apply this solvent I watched in preperation, I put dichloromethane in the syringe to let me apply a small amount and have it soak up between the sheets using capiliary action. What I didn’t identifiy as important was that all the videos I watched used glass syringes which slide more smoothly than plastic ones do. Unfortunately the plastic ones have a much more stuttery plunge, and as such the dichloromethane spurted out quicker than I intended and a small amount splashed up towards my face, landing near my eyes.
At this point there was a certain amount of panic on my behalf, despite there only being a tiny amount that splashed. I really could do without losing any amount of vision if I can avoid it. Thankfully I know just outside the workshop is the first-aid stand which has eye wash solution, so with the help of Graeme who happened to be in the workshop I went to get some, remove the safety gloves I was wearing, remove my contact lenses, and give my eyes a thorough rinse for a while. I also then washed my face, and then rinse my eyes some more for good measure.
At this point, I am okay, there’s no burning, my vision is okay. However, given how important my vision is and I’m a bit of a worrier at the best of times, I found the whole thing a little unsettling. Thankfully Jonathan and Graeme were around to help convince me that if I had got some in my eyes I’d know about it, and if I was still concerned I should go get my eyes checked.
That I did. I phoned my opticians and they fitted me in a couple of hours later, something for which I’m very grateful. My regular optician gave me a quick eye-check and gave me an all clear, and an unofficial perception to head home and have some real ale to calm my nerves. Having a proper check enabled me to finally relax.
All in all, not my proudest of moments, all because of a silly oversight.
It was my own foolishness that I didn’t think to wear safety goggles when using a solvent like this. I just wasn’t acoustomed to doing this, so wasn’t aware of all the things that could go wrong, but that’s not much good had I been less fortunate. Whilst it was a new solent to me, that’s not really the issue here - I use superglue fairly regularly, and it’s a common luthier trick to dilute this down to be more runny and apply it in exactly the same fashion. The fault was I’m not used to handling liquids with a syringe so didn’t think of the consequences as I lacked experience.
Thus, my advice to you is, as ever, wear your PPE in the workshop. Even if you haven’t spotted a risk, wear some eye protectors, as there’s no real downside to doing so for most things.
If you’re in a workshop regularly like I am, get your own PPE that is comfortable to wear so you’re more likely to do so. For example, for xmas Laura got me some workshop safety trainers, and now I wear them all the time in the workshop as a matter of course. I was trying to do that with my move to contact lenses and the habit hadn’t yet taken, but now I’ll redouble my efforts.
As an aside, I think I’ll put to one side the acrylic test guitar idea for a bit and stick to wood. It’s not just the fun with solvents, but actually it’s hugely wasteful in terms of acrylic given the weight relief required. It’s also quite expensive compared to wood: given the cost of acrylic, wood is 2/3rds the cost for heavier ash, and even more expensive than swamp ash.
So, personal drama dealt with, let’s get back to guitar building. Earlier in the week I made another neck blank and jig, as I did a few weeks ago for the Corvette (here and here). This is going to be a prototype for my new way of making the necks, as all the other necks I have in progress are using nice birds-eye maple, and so I wanted a cheaper bit of wood to trial it on first. I also want to replace the neck on The Blues Deluxe build, so I’m using this as a chance to kill two birds with one stone.
Thus I laser cut a new template (this being a longer scale length compared to the one I cut previously), and broke out the hand router.
I also routed out an MDF jig to let me work on the headstock. As I said above, the whole point of this neck really is to be a guinea pig for this new process. If you look at the following picture, you can see the headstock in the jig:
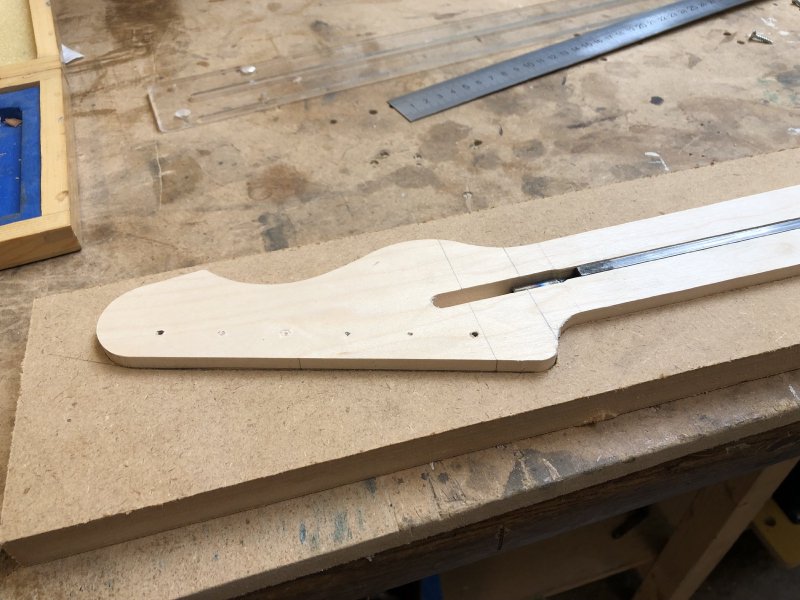
I want to use the bandsaw to take off the front face of the headstock up to the left-most pencil line on the face. From the cut out piece to the second pencil line will be a shallow curve up, which I’ll put in using the spindle sander. In theory it’ll all go well, but given I have three necks in the queue with nice birds-eye maple, I wanted one plain old maple neck so that if it doesn’t go to plan I found out on the less expensive material.
All this is blocked however on the new bandsaw at Makespace getting commissioned. It has now arrived at Makespace, and Graeme has already done a bunch of the initial setup work for it, but we discovered that whilst its operating current is 9A, the initial peak current requirement as it spins up the motor is 16A, so a regular 13A plug won’t cut it: we’ll need to install a new single phase commando socket in the workshop.
Given I’m now backlogging on necks, I spent time getting another body ready. This time, it’s one of the two commissions I have going on right now, and indeed one that a friend commissioned last year but got blocked with the never-ending CNC Router issues, and has been a bit of weight on my shoulders as time goes on.
When I took on the commission from my friend Andy (guitar #6 in my books, though now I’ve made 8 guitars by this point), I was still on good terms with the CNC router at Makespace - it was yet to develop its habit of eating all the nice bits of wood I put before it. Thus I happily came up with a semi-hollow design for a guitar that I wouldn’t be able to build by hand.

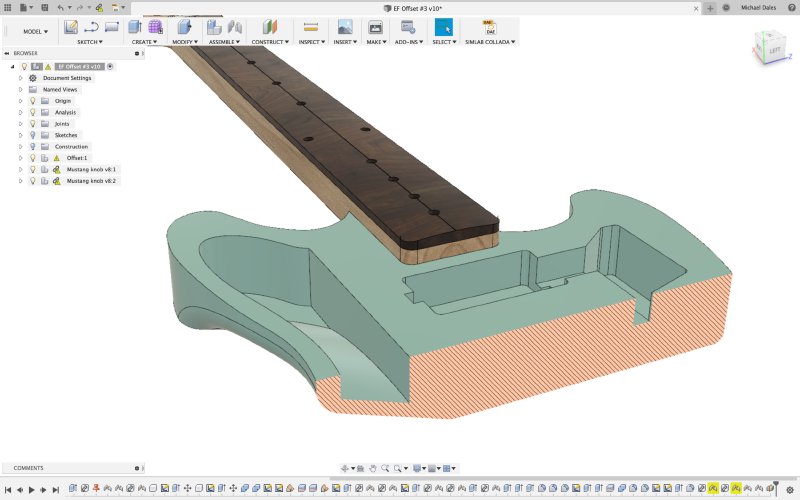
The design complexity comes from the body being hollowed and having a belly carve - that means there’s a thin non-flat surface there, and I didn’t have the confidence that I could do that by hand, which you can see here:
So for the last year this has hung over me, with the CNC router never getting to a point where I could trust it, and I’ve decided that this has to stop. I either need to build this guitar or scrap the project. A combination of things pursuaded me to give it a go. Firstly, because I realised there was a challenge here and Andy was a close friend, I didn’t take a deposit from him, but I did buy the wood, so if I mess up he’s not out of pocket and I can write off the expense as a learning experience. Secondly, Now that I’ve spent more time around other wood workers, particlarly those who make bowls on the lathes, I can kinda see how to do it by hand now.
In the end, it didn’t matter as you’ll see, but I guess what I’m trying to say is I procrastinated on this one a long time, but at some point you just need to move forward and accept that things may not work out. Or call it all off :) But do one of the other, don’t let it become a weight over you like I did with this one.
The body blank I had already assembled for Andy’s guitar a year ago, it’s just sat in storage waiting all this time. The first thing I observed when picking it up: it’s actually amazingly light, lighter than even the other swamp ash bodies I’ve made.
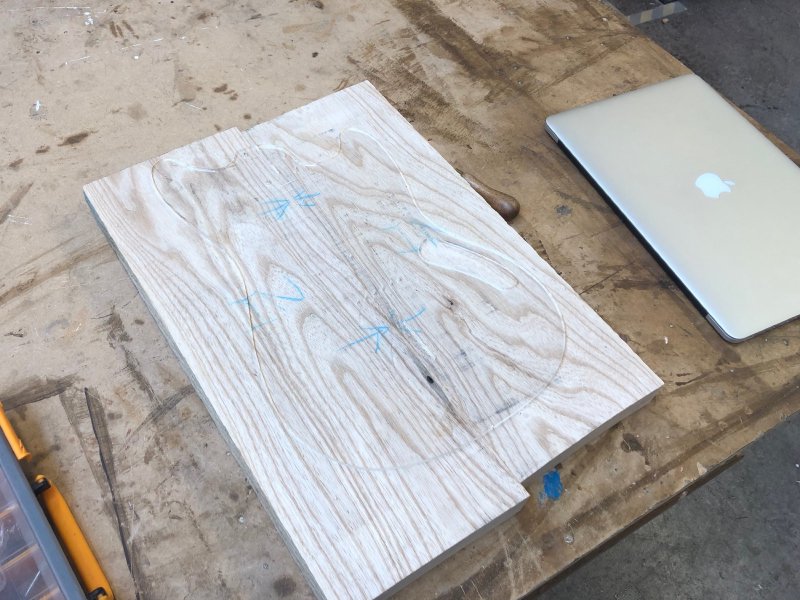
When I sent that picture to Andy he commented on how lovely the grain was, but I was forced to point out that because it was semi-hollow we’d be forced to put a cap on the top and it’d be lost. However, given it felt so light, I proposed to Andy we see what the weight is at the end of the roughing out and then decide if we want to make it semi-hollow, or see if the exceptionally light wood would be sufficient. He agreed to this plan, and I got to work.
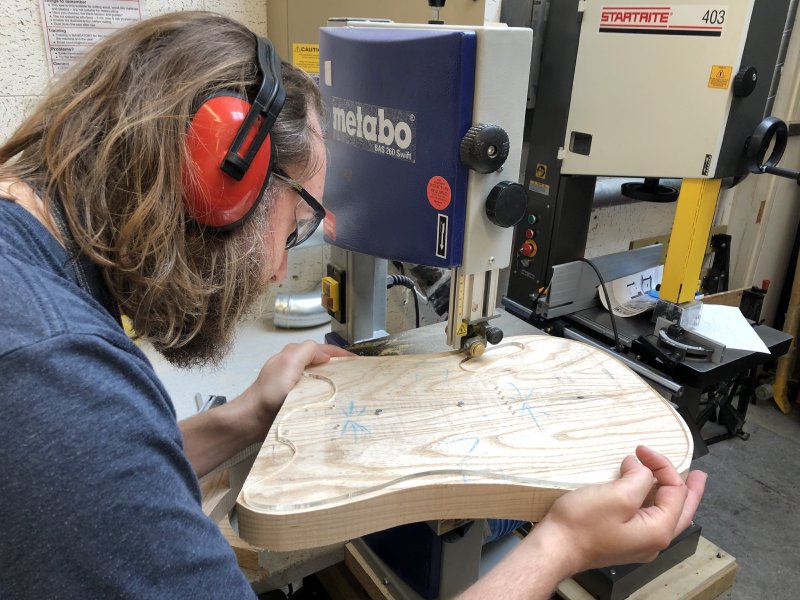
The first stage here was to use the old bandsaw (which was big enough to cut a body like this, just not to cut the face off a neck blank as above) to lose most of the material around the body (note the new bandsaw in the background in this picture!).
That done, the next task was to use a hand router to do finishing passes to make the body perfectly flush with the template.
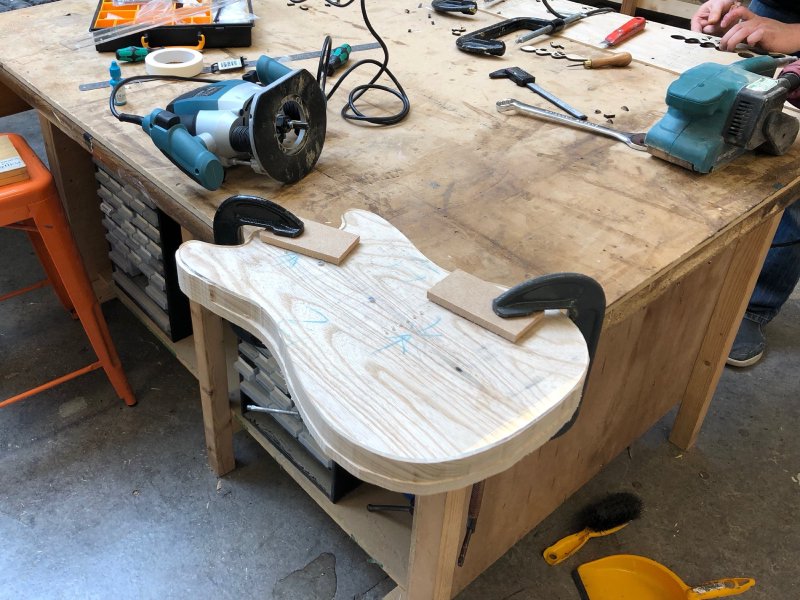
The ultra observant of you might have noticed that the hand router in this picture is a bigger one than the one I was using earlier in the week to route out the neck. The router I used on the neck is the one in the Makespace workshop for general use, and the second one belongs to a fellow Makespace member who kindly let me borrow it. The workshop router has develoed a small flaw now where you can descend the nut that holds the bit in place below the bottom plate, and I’ve now twice accidentally done this when trying to make deep cuts, marking the wood I was working on, and I didn’t want to repeat that mistake.
It was interesting using the big router. Although slightly more clunky in terms of being able to see what you’re doing, the step up from a 1.2KW to a 2KW motor made the job significantly more easy, and the larger base plate offset the larger bulk of the router itself in terms of balance. So the net result was not mistakes on the deeper cut required on the body, and it was much easier to remove material. I’ll be using this router for most things in future I suspect.
Now that the body was the right shape I needed to decide how thick was it going to be? Was it about right as is for a solid body, or did I need to take 5mm or so off on the assumption it’d be hollowed out and a cap put on. So I found some scales, and was surprised at how light it was already, without even the material removed for pickups, comfort carves, etc.
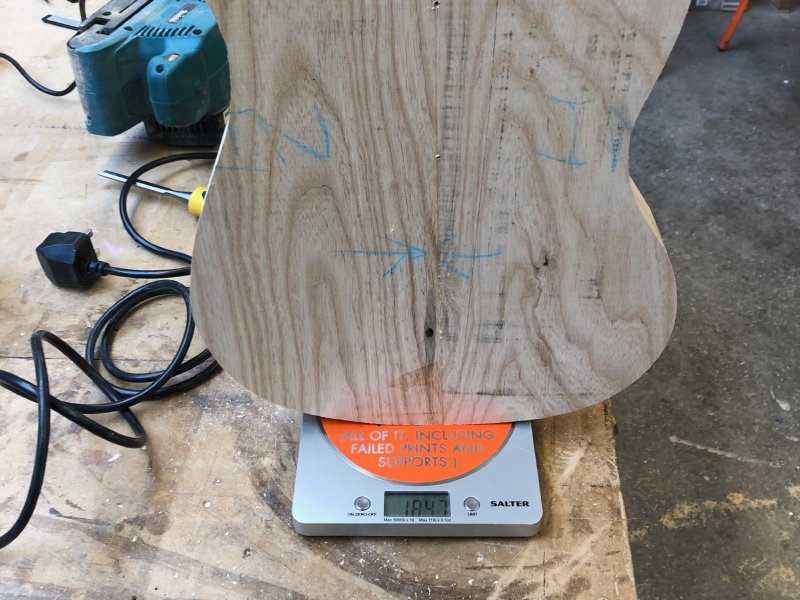
Normally I’d exect a light body to be 2 to 2.5 kilograms, so 1.8 at this stage is really quite light indeed. I had a chat with Andy, and he said this was good, he was happy with this weight and we’d keep the body solid. this is a good result for all: Andy gets to keep the grain he likes there, and it makes my job simpler in building it.
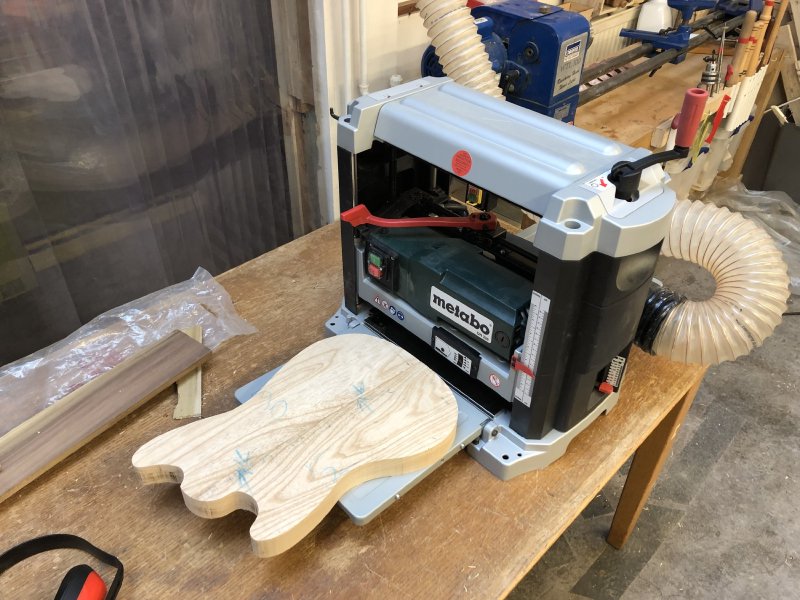
The last step was just to take down the front and back a hair. In the past I’ve used the CNC router with a 2” bit to do this, but as I discovered on the last swamp ash guitar I ran through it, this tears the grain somewhat, so this time I took advantage of the fact we have a thicknesser at Makespace wide enough to fit an entire guitar body and has been turned to eliminate snipe (over cutting on entry and exit).
After a year procrastinating on this build, it’s great to finally get it going.
With all these guitar bits in progress, it probably bears a quick recap of what’s being built right now. I have two mustang-style commissions in progress (guitars #11 and #6), the Corvette build (a custom offset design, guitar #10), and a replacement neck (for guitar #3). And that’s also the order of priority: whilst I’m keen to get the Corvette build moving forward again once we have the new bandsaw in place, the customer commissions come first. This is quite a fortunate place to be in, and it’s nice to have things moving forward again.