A week in and out the shop
Published 20 Aug 2019
Where to start this week? It was a very mixed bag, with the week starting with frustrations (broken/missing tools, causing me to spend a bunch of money I hadn’t expected) and then ending with an unexpected amazing happenings (a fully 3D printed guitar body prototype!)
Let’s start at the frustrating part of the week to get that over and done with. Last week I mentioned that things were going south with the neck build I was doing to prototype my new more manual build process (of which I still intend to do a proper write up), but rather than just abandon the build there and then, there was still more to learn from this neck before I moved on. As a general rule, if you’re working on something and it goes wrong, it’s worth asking if there’s something to be gained by pushing it a little further, either to practice and hone existing techniques or try out new ones, and with this I got to do a little of both in this instance.
Anyway, given things had gone sub-optimally when I glued on the fretboard the main thing I wanted to do with this neck was still finish the headstock transition: this was something that previously I’d done with the CNC router, and so wanted to try by hand once before I do the necks for the commissions I have in the queue. Before I can look at the headstock transition though I had to first remove most of the excess of the wood from the fretboard material, making it flush with the rest of the neck at the heel and sides (I could have done with more pictures here, sorry, but I hadn’t realised what was about to happen :). To do this I used a hand-router with a follow bit, but unfortunately in the process ended up tearing the edge of the wenge fretboard.
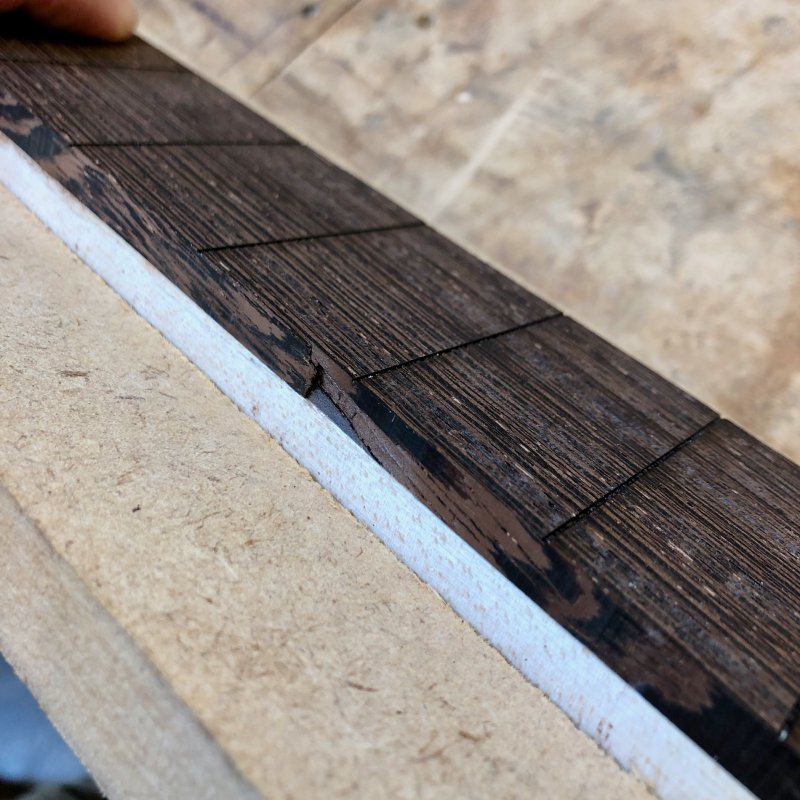
Wenge is a difficult wood to work with, and I’ve said previously I don’t plan on using it until I get better at woodwork, but I have quite a bit in stock, which is why I was using some for this test build. Wenge is a weird mix of hard and soft wood, and that combined with the shallow grain angle here made it very susceptible to the kind of tearing damage you see above.
At the time the way I solved this was by doing something you’re generally not advised to do with a hand-router, which was switch to using climb cutting. There’s two ways you can use a hand router when going around a workpiece like this: either counter-clockwise (conventional cutting) or clockwise (climb cutting). For hand-routing the rule is that conventional cutting is preferred, for CNC routing you tend to use climb cutting. The main reason of using conventional cutting with a hand-router is that you’re pushing against the direction of the bit rotation, so the hand-router will not run away from you, keeping you in control of the router at all times. With climb cutting you are pushing with the direction of the bit acting like a wheel on a car, so it wants to speed away from you which has obvious safety implications. However, the other side effect is that with conventional cutting as the cutting surface of the router bit digs into the wood you are reinforcing this motion as you push, digging the bit further into the wood as it turns, making tearing more likely. With climb cutting you get more a compacting action as you move the router back relative to the bit’s cutting direction, reducing that risk.
Given in this situation my neck was firmly clamped down, I was using the smaller, less powerful, hand-router, and I was only removing a small amount of material (I’d removed the bulk earlier with the bandsaw), I switched cautiously to climb cutting for the rest of the neck, and I avoided any further tearing.
However, potentially what I could have done, had I had an appropriate follow bit with the bearing on the other side, would be to flip the entire workpiece over so I wasn’t cutting into the grain line, just as you would turn the piece around if you experienced tearing with a hand plane. Obviously if you’re doing conventional cutting here you’re still using the tool where it might tear more, but working with the grain direction lets you use the safer conventional cutting with lower risk.
In this case it’s not the end of the world that I had a small chip: wenge being a dark wood with varied texture is fairly easy to patch using a mixture of sawdust and wood glue. But still, it’s something I’ll think about more next time I use wenge.
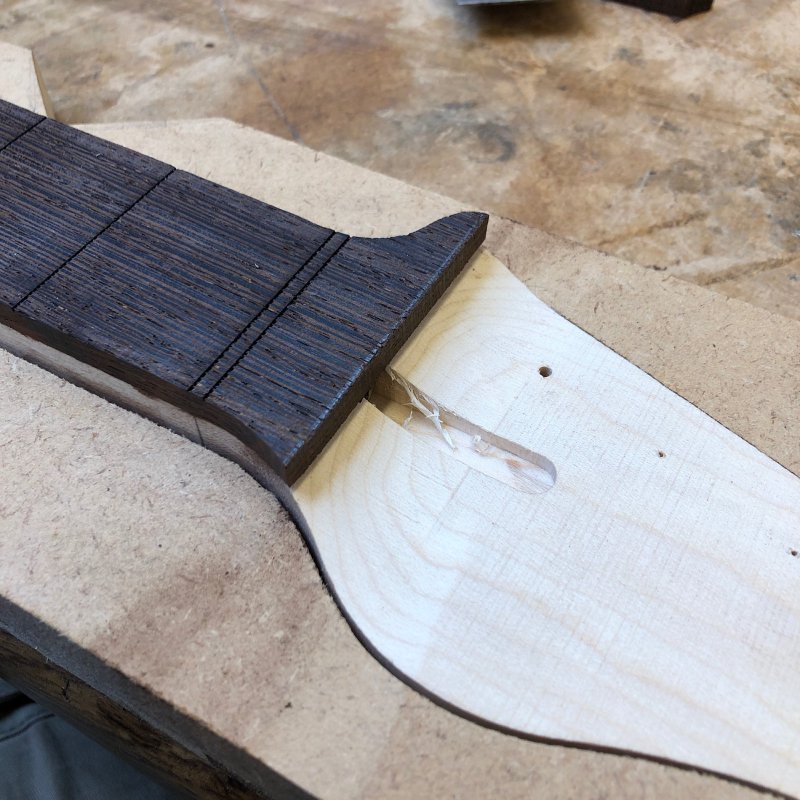
The hand router let me get all the fretboard flush with the neck, except the headstock. Here you can see that I have an overhang above the transition part I made last week. The next task was to finish that transition.
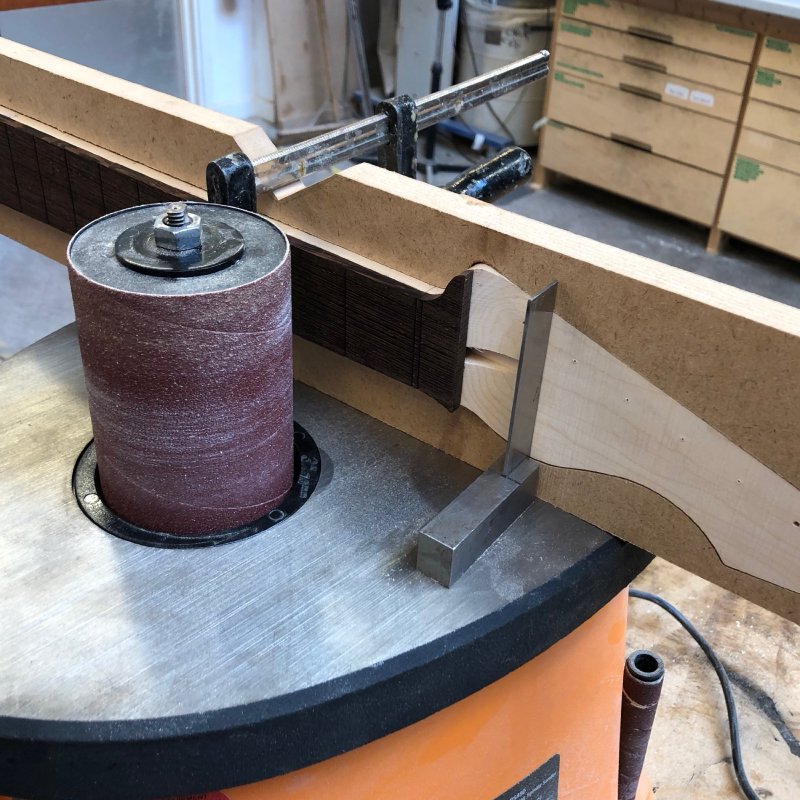
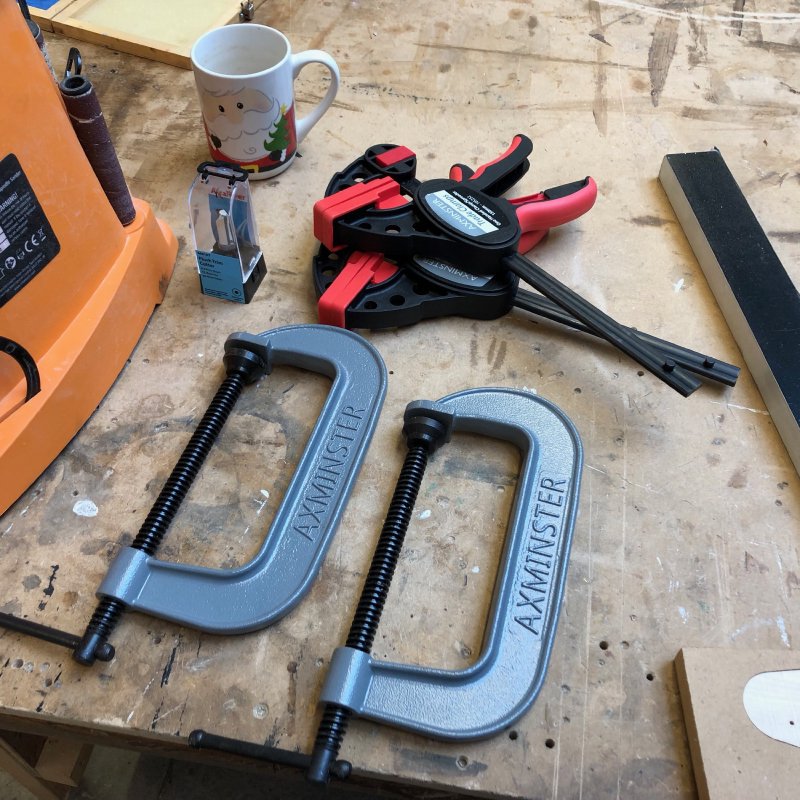
Unfortunately, in the gap between my using the spindle sander last week to round out the main part of the neck and when I came to complete it with the fretboard attached the Makespace workshop had suffered a sudden drought of clamps. For all the benefits of working in a community workshop, this is one of the downsides: at times the things you come to rely on will be broken or missing. The problem isn’t that things break (it’s a workshop) but rather that members have a tendency not to report that things have broken.
In general at Makespace we try and make reporting such things easy, and at every opportunity make it clear that this is normal for a workshop and no one will hold it against you if something breaks whilst you’re using it. Unfortunately people still tend to be embarrassed or scared at having broken something and, so often the first time you realise things are missing is when you go to use them, which is quite frustrating as it can waste a lot of time. I tried to make do with an old F-clamp rather than the one handed clamps I wanted to use, but it wouldn’t hold properly, so I was forced to give up on that task for the day rather than make a mess of the operation.
Whilst for Makespace we ordered some replacement clamps, I decided this was also time to order my own small set of good clamps, so I went over to Axminster and ordered a pair of G-clamps and a pair of one-handed clamps that I can then rely on to be always at Makespace and always in a known good condition. Good clamps are not cheap (£15 to £20 each for the sizes I’m looking at), but compared to the wasted time here I’d rather just spend the money and try recover that by making more guitars. Having my own also deals with the other downside of a community workshop in that we have to buy things on the assumption they’ll be abused (not deliberately, we just have a lot of people who start inexperienced at Makespace), so we can’t justify having the nicest of everything. For most jobs that’s fine, but occasionally it’s not, so this outlay also covers me for this.
Once the clamps turned up I was able to get the neck on the spindle sander set up properly and it did a top job of rounding out that transition.

So, despite the neck not being fit for purpose currently, I still learned a couple of things by continuing to push it forward a little more. I have a sneaky plan to try this week to see if I can fix the thing that went wrong, but even if that doesn’t work I still managed to extract more value from the neck than I would had I just given up the moment I realised I’d messed up when gluing.
Next up I went to route out the control and pickup cavities on the set of bodies I have on the go. First step was to make some more templates for the internal cavities.
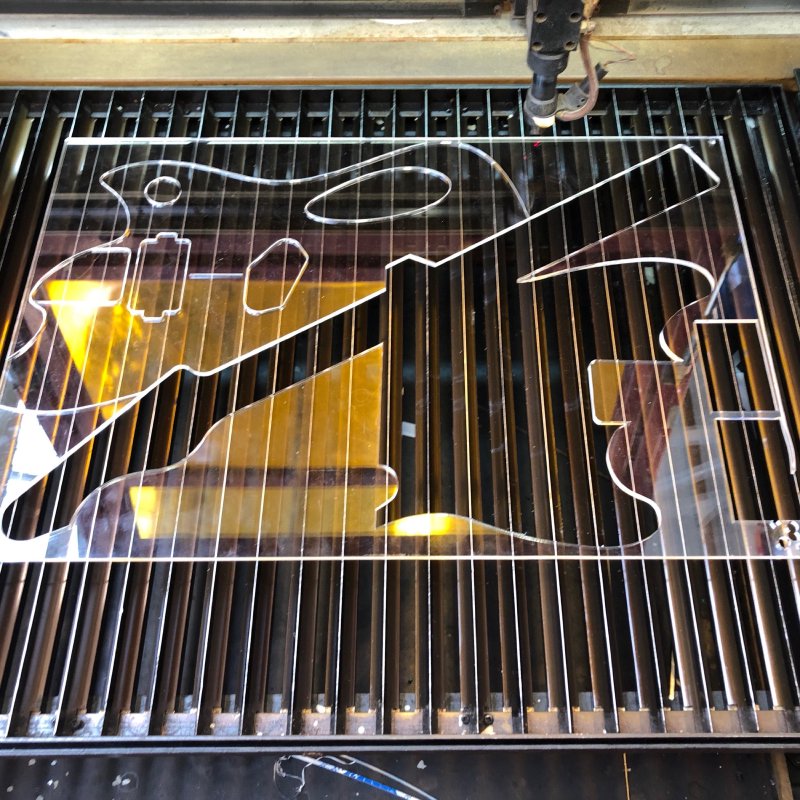
The 5mm clear acrylic I use for templates is about £10 a sheet, so as you can see I like to get as many templates out of a piece as I can! Unfortunately this is about as far as I got this week, as again I was frustrated by the stock Forstner bits in the Makespace workshop, which were just too blunt for purpose. When I tried them on a bit of scrap they just started to burn the wood without cutting into it.
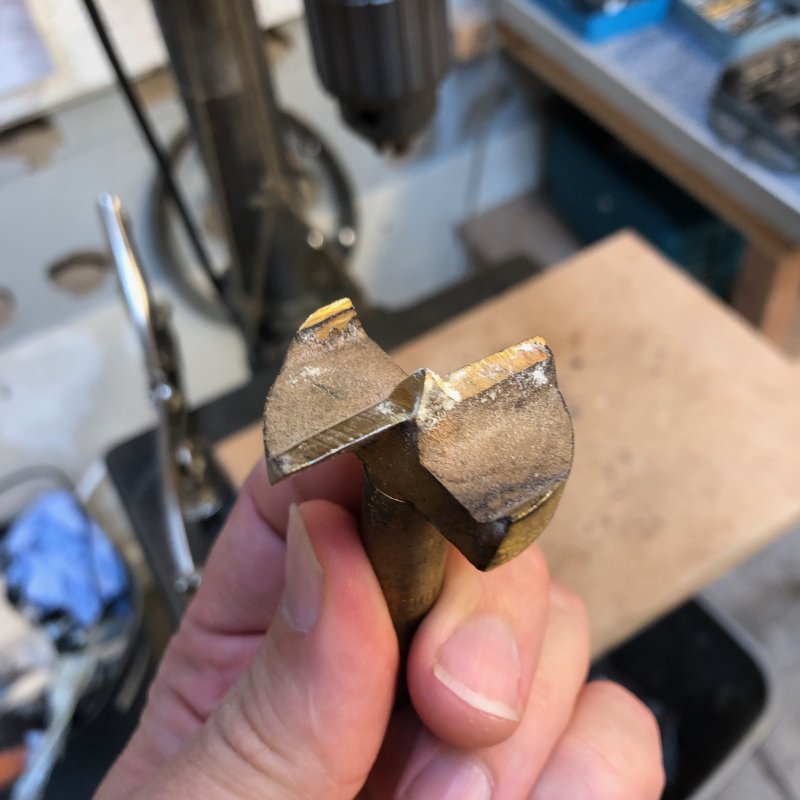
When using a hand-router to cut pockets you generally want to remove as much material as possible using drill bits before hand, using the hand-router more as a finishing tool rather than for bulk removal. For this you ideally want Forstner bits for, as the guide spike isn’t too deep (compared to a spade bit) and thanks to the circular outer guide you can cut overlapping holes easily, whereas other bits will want to slip into existing holes if you try to overlap them.
This is another case where in the end I have just ordered my own so I always have my own sharp set to hand, rather than rely on the shared ones in the workshop always being in a top notch state. Another unexpected expense, but at this point I’d rather just spend the money and know I won’t be blocked by this in the future. Thus I wasn’t able to route out the body cavities last week, that’s now a priority for this week.
After a frustrating week in the workshop, on Saturday it was nice to take a trip across to the Engineering Build Space at Warwick University, where on Saturday department lecturer Simon Leigh hosted an Autodesk Fusion 360 Makers day. I’m always on the look out to see how I can improve my Fusion 360 usage, so signed up to the day despite not knowing quite what to expect.
What I found when I went was the maker-space equivalent of a candy land. They had a good workshop space in one half, with lots of bench space, woodwork tools, lathes for both metal and wood, a very nice CNC mill, and other things I’d hope to find in such a shop. In the second half though they had the more experimental tools, befitting of a space that is actually part of a research department at a university: giant 3D printers, printers that use non-conventional materials or nozzles, and so forth. It was the kind of place that just leaves your mind fizzing with ideas and inspiration as it makes you aware that the little box you assumed you had to work in is much bigger.
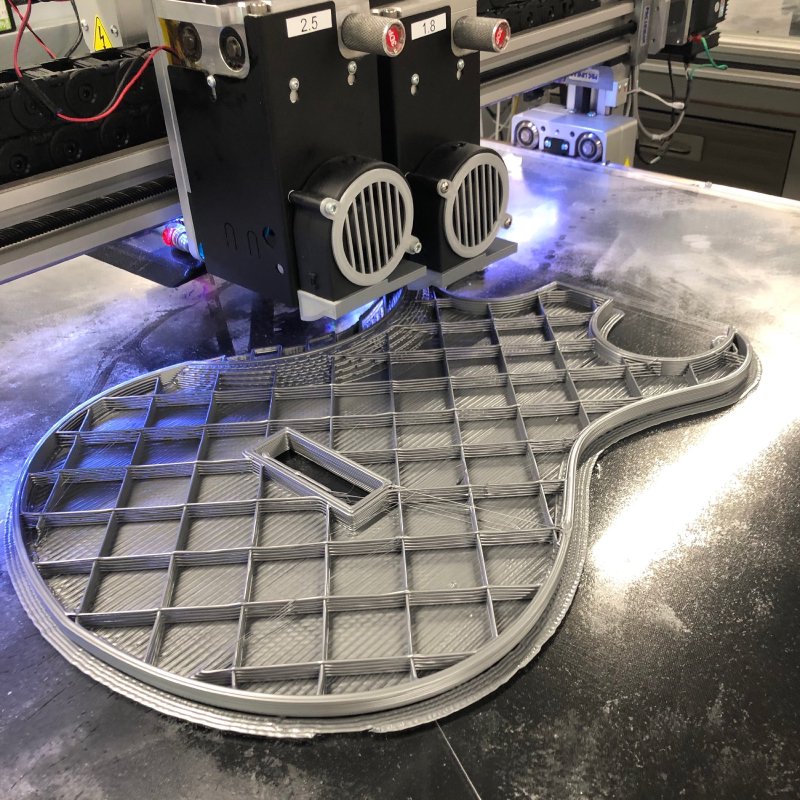
There was no real agenda to the day, beyond a meeting of like minded people, so after being shown around the equipment I realised that I might be able to solve a problem that I discussed here a few weeks ago: how to quickly prototype a guitar body to see if the ergonomics feel right? It’s one thing to see a guitar design on screen, but it’s another to actual have a physical model of it. In the past I’ve made 1/4 sized prints on the Ultimaker at Makespace, and that at least tells me that visually things are okay, but to know what it feels like takes an actual thing in your hands, and then you really need a full size model. I looked at several techniques to try and make it faster than just building one with wood and in the end nothing was that practical in terms of either cost, time, or weight. But here I was somewhere with a 3D printer that had a build volume of 1 x 1 x 0.5 m, more than plenty to print a guitar body…
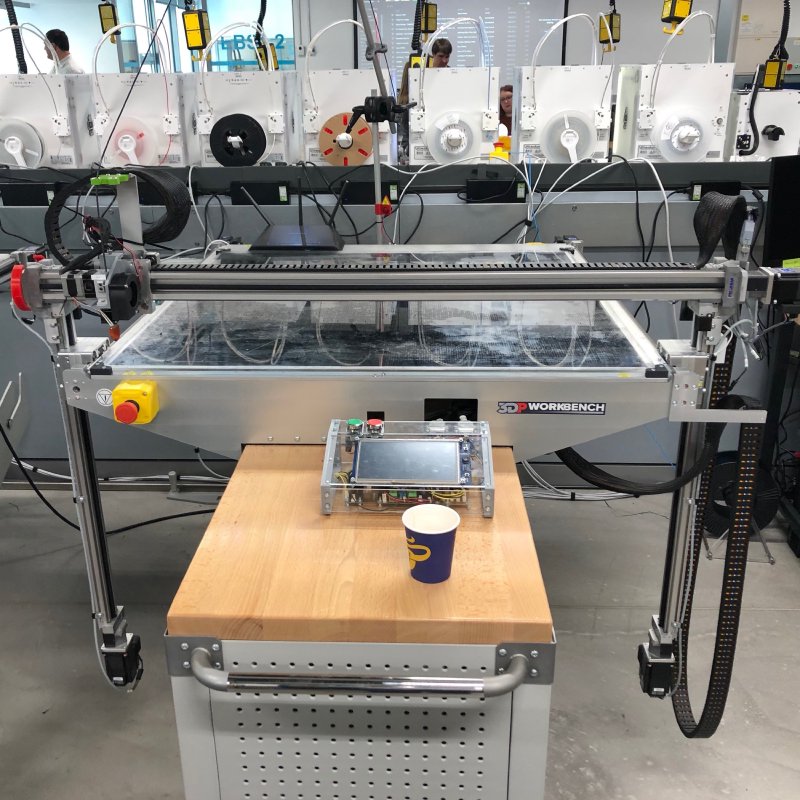
I forgot to bring a banana for scale in the above picture, but between the cup of tea and the row of ultimakers behind you should start to get an idea for the scale of the machine :)
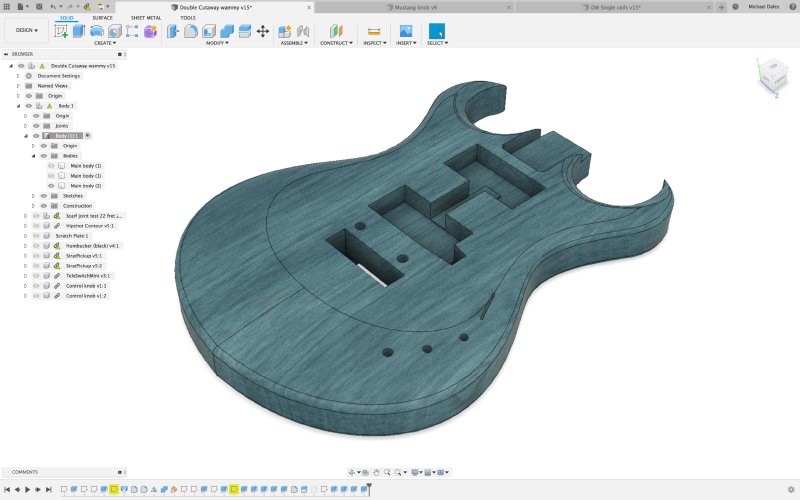
So faced with this machine I had to ask if I could try printing a prototype body. Simon though this would be a fun idea, and pointed me towards Liz Bishop, one of the department’s engineering PhD students, who spends her time trying to solve some of the technical/material challenges of printing on such large machines. To make the print more meaningful, I picked one of my designs that I’ve wanted to make for ages but has a non-uniform top, so would be hard to make quickly by hand, or at least very time expensive for a prototype that might prove the design wasn’t good.
Given we wanted the print to be complete during the meetup, Liz and I made a few tweaks to the design to speed up the printing, namely removing the control and tremolo sprint cavities on the rear (basically details that don’t matter ergonomically), and Liz took some educated guess on things like infill density and outer layer counts to try and keep the print time down too. With that done, we kicked the job off.
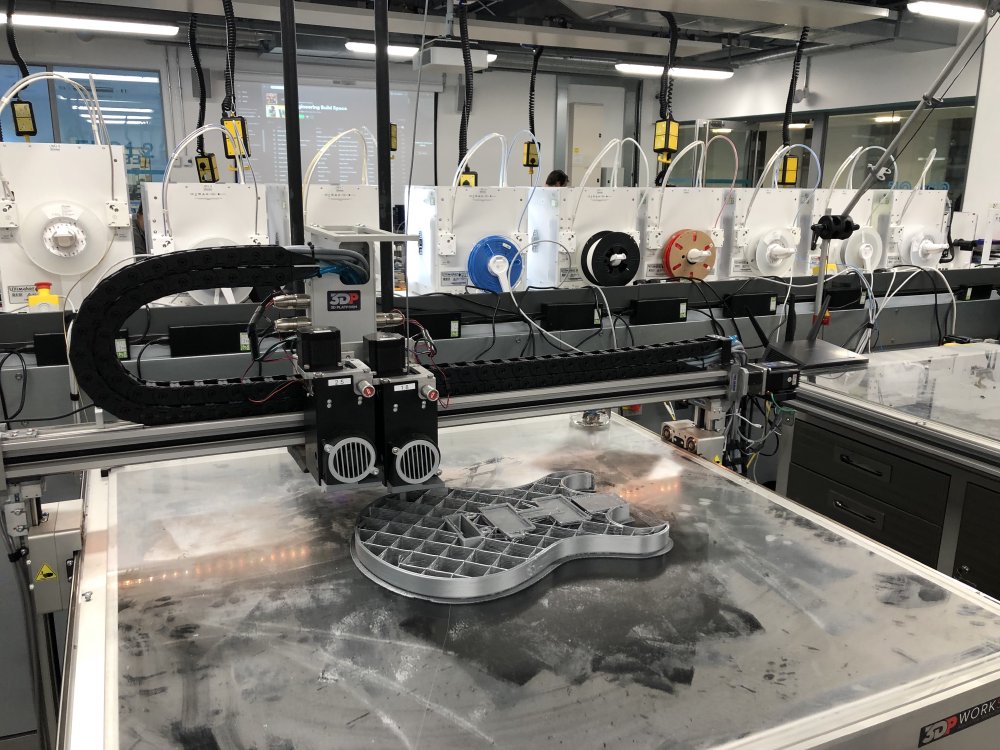
And six hours later (with some careful monitoring from Liz and some olympic-level filament swap over action), we had a full-sized guitar body!
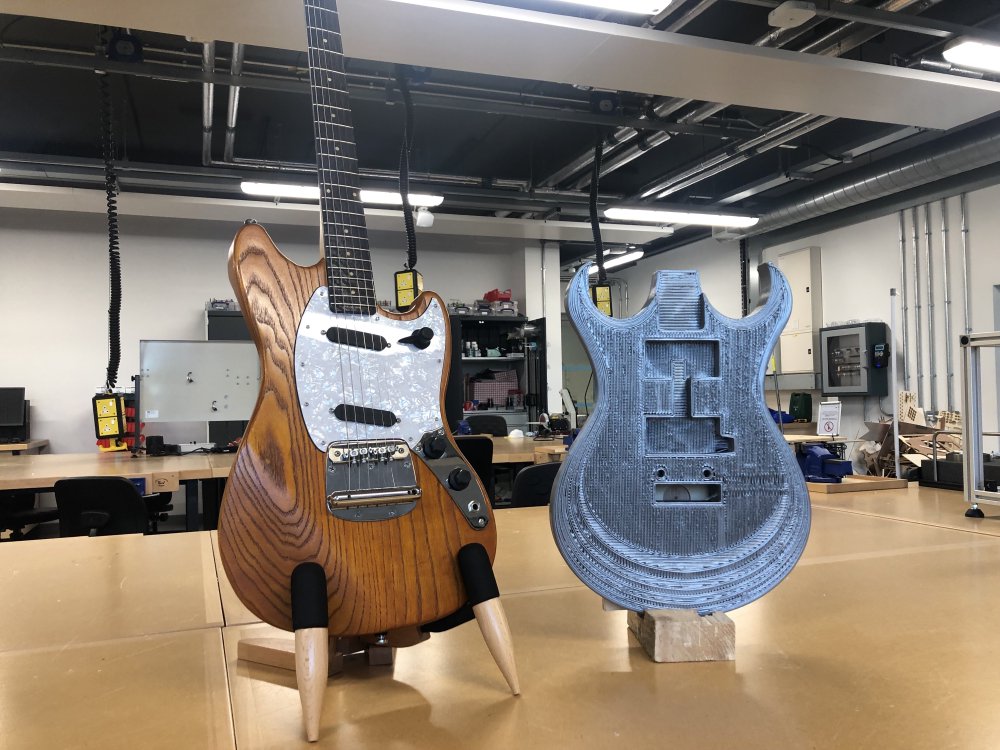
The idea with this print is just to get a sense of how the design looks and feels at scale. My plan is to put a neck on it in the coming week, but already I’m over the moon to see my design at actual scale. I like the lines it has and it feels good to hold. Once I have a neck on it I’ll know a lot more, but even just in this form it tells me a lot about the design I can’t get from screen. Weight wise it’s a little light, at 1.2 kg, compared with roughly 2 kg for a wooden body, but it’s close enough still, and if we were to repeat this we could tune the infill to get the weight up - which is a better position to be in than when I looked at doing this with acrylic, where I was struggling to get the weight down from an initial 4 kg estimation. Cost-wise it’s also quite reasonable: a 2kg spool of filament costs around £45, which is a lot cheaper than what I’d need to spend on acrylic when I looked the other week, and probably about right if I use lower quality wood.
Because this was a spur of the moment print, and we were pushed for time, we didn’t try to make a body that we could string up - the minimal infill means that it’d likely snap if we tried. However, Liz and I are already planning a round two at some point, and then perhaps even crazier things if that works out :)
The guitar body wasn’t the only experimental print I got to do at the weekend. One of the things I’ve been wondering about is how I make custom control knobs now that Makespace has got rid of the FormOne resin printer we had. Whilst I liked the finish on prints from the FormOne, the overheads and failure rates in a place like Makespace were unsustainable, so we got rid of it and replaced it with two more Ultimaker printers. However, getting a finish like the FormOne on the Ultimaker is less of a known thing.
I was chatting to Chris Purcell, another staff member from the Engineering Build Space about this, and he introduced me to Polysmooth filament, which is designed to be as easy to print with as PLA filament, but be polishable using a solvent like IPA to remove the ridges that you get on a filament style printer (they even will sell you a special machine for this process). As a demonstration Chris and Liz helped me print one of my controls that I had made before using their Polysmooth filament.

Straight out of the printer it has the common layer ridges, but then Chris made a quick ad-hoc IPA vapour chamber to let us get an impression of how it’d smooth out. By the end of the process we had something that whilst not perfectly smooth, was enough to demonstrate the potential, and certainly something I want to play more with.
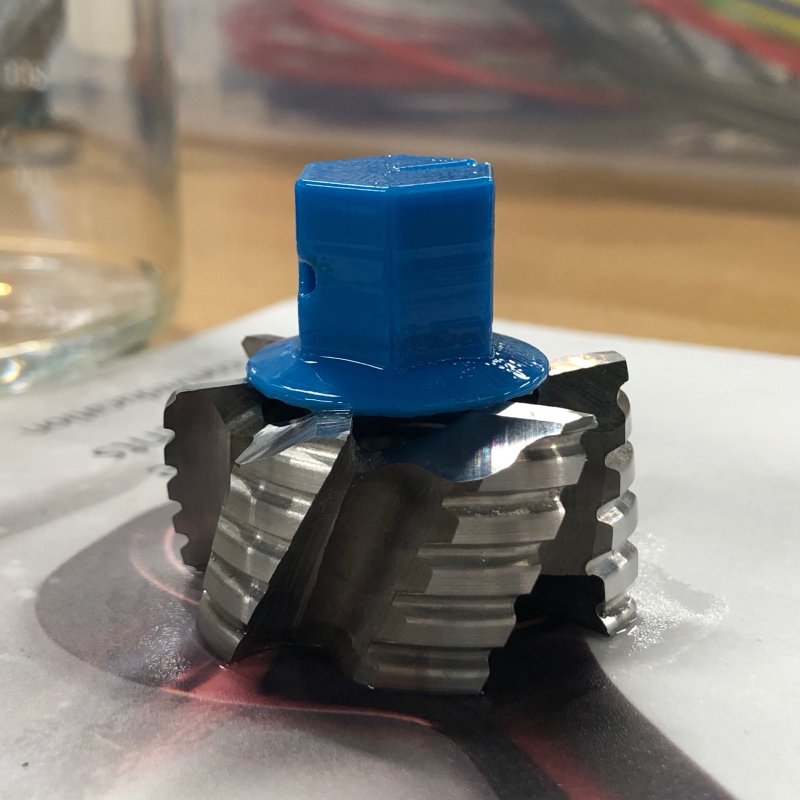
The main area where it was lacking was on the top surface of the print, where there was a grid like pattern from the printing that was particularly pronounced. However, Chris then pointed me at another PhD student of the lab, Elliot Griffiths, who introduced me to an option I’d not seen in Cura before: ironing.
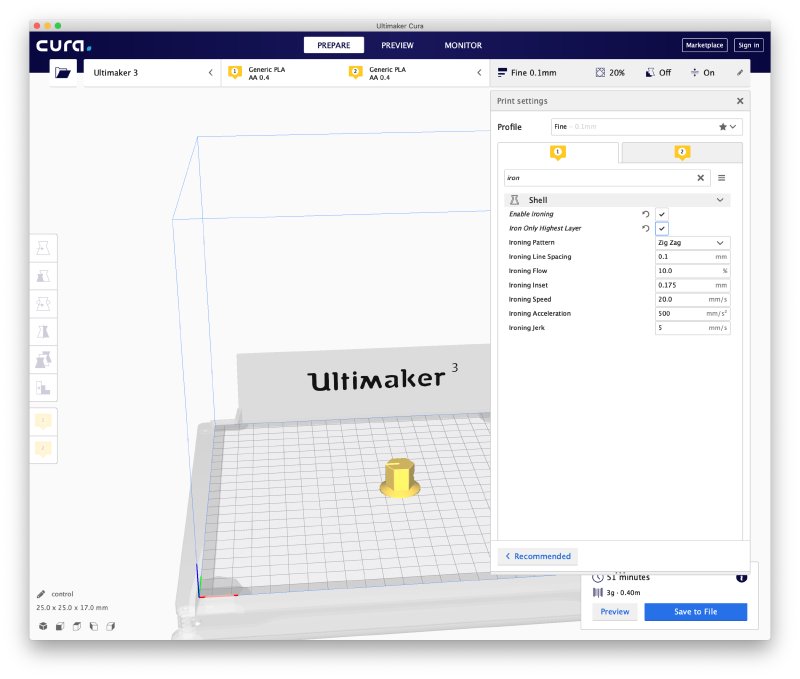
With ironing you can get the 3D printer to do a second pass on a layer where it doesn’t extrude any new material, but rather uses the heated nozzle to press down on the just printed layer with a fine step over, effectively ironing it like you would with clothes. We didn’t have change to test that there and then, but it’s something I can test out on our Ultimakers back in Makespace.
Between the above and the other conversations I had it was a wonderful event: I met people who knew a lot more than me on 3D printing and I learned a lot from them, and it was great to see some of the future of digital making at the same time. My thanks to Simon and the Engineering department of Warwick University for running the event, and to Liz, Chris, Elliot and everyone else for being very generous with their time and knowledge.